.png#keepProtocol)
Google Knowledge Studio is now Google Looker Studio, and it is making knowledge reporting much more accessible, visible, and impactful than earlier than. The brand new interface, options, and performance have some critical benefits on the subject of visualizing aggressive knowledge insights.

On this information, we’ll introduce a number of the coolest, latest options of the platform to get you ramped up rapidly. We’ll additionally stroll you thru probably the most notable modifications between Google Knowledge Studio and Google Looker Studio.
![→ Download Now: SEO Starter Pack [Free Kit]](https://no-cache.hubspot.com/cta/default/53/1d7211ac-7b1b-4405-b940-54b8acedb26e.png)
Professional Tip: Even with the main overhaul, Google Looker Studio continues to be fully free and accessible to all (even if you happen to don’t have any knowledge of your personal!)— meaning you possibly can comply with together with this tutorial in real-time.
What’s Google Looker Studio?
Previously referred to as Google Knowledge Studio, Google Looker Studio is a enterprise intelligence and knowledge analytics platform developed by Looker, which was acquired by Google in 2020. Looker Studio permits companies to investigate and visualize their knowledge in a manner that’s straightforward to know and act on.
With Looker Studio, you possibly can create customized dashboards, stories, and visualizations to achieve insights into your enterprise operations. The platform affords a variety of knowledge connectors and report templates, permitting you to interpret knowledge from varied sources.
How you can Use Google Looker Studio
- Log in to Looker Studio.
- Familiarize your self with the dashboard.
- Join your first knowledge supply.
- Create your first report.
- Add some charts.
- Customise the formatting and add a title and captions.
- Share the report.
1. Log into Looker Studio
To log in to Looker Studio, you’ll want a Google account — I like to recommend utilizing the identical one as your Analytics, Search Console, and/or Google Adverts account.
After logging in, you’ll land on a web page displaying your most up-to-date Looker Studio stories.
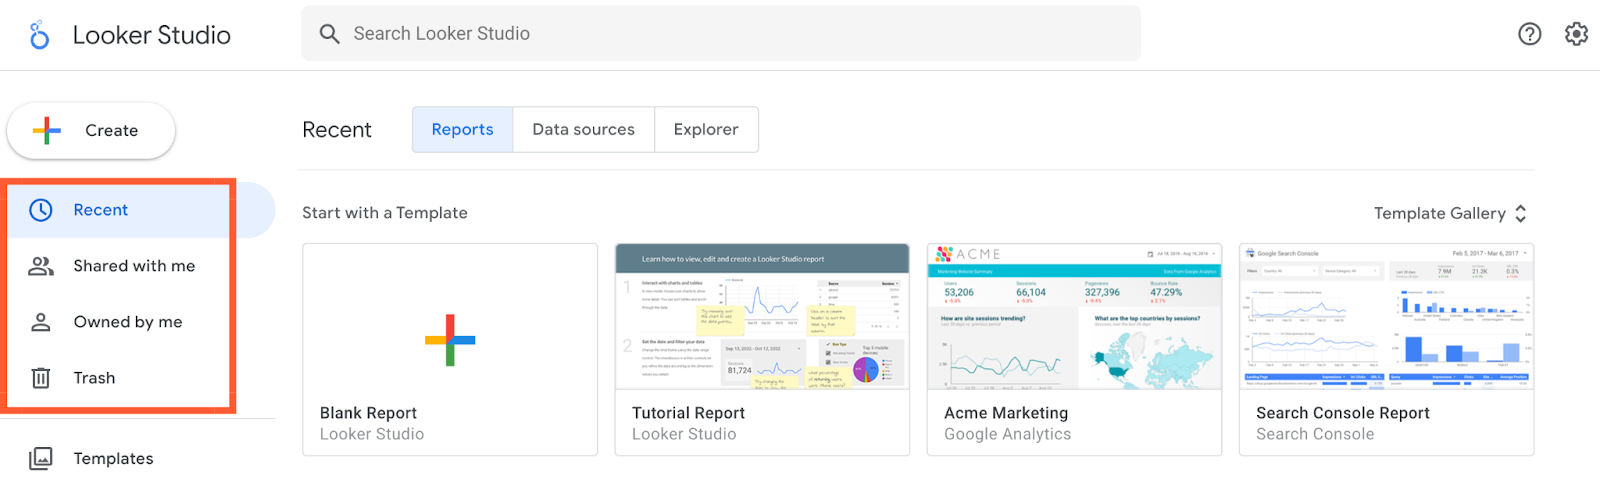
2. Discover the Looker Studio Dashboard

If you happen to’ve used Google Docs, Sheets, or Drive earlier than, this dashboard ought to look fairly acquainted. Within the middle, you will have the choice to start out a clean report, begin a tutorial, or see report templates. To the left, you may see a column that homes a number of tabs together with Studies, Shared with me, Owned by me, Trash, and Templates. On the prime, you may see three extra tabs: Studies, Knowledge sources and explorer.
Let’s go over every of those tabs intimately.
Studies
Right here’s the place you possibly can entry your whole stories (equal to a workbook in Tableau or Excel).
To create a report in Google Looker Studio:
- Click on the Create button.
- Select Report.
- Add an information supply.
- Customise your report.
As soon as you’ve got created your report, you possibly can entry it later in your dashboard. To comfortable by a number of stories, filter them by identify, proprietor, or final opened date through the use of the dropdown filters.
Knowledge Sources
Knowledge sources listing all of the connections you’ve created between Looker Studio and your unique knowledge sources.

To create an information supply in Google Looker Studio:
- Click on the Create button.
- Select Knowledge supply.
- Enter in your organization data, click on Proceed.
- Arrange e mail preferences.
- Choose a Google Connector.
- Authorize the Google Connector utilizing a Google Account.
- Select the account and property you wish to view.
- Click on Create Report.
Professional Tip: If you happen to’re utilizing Google Analytics and/or Search Console (which I extremely advocate), you’ll must individually join every view and property, respectively. So if in case you have three GA views for 3 totally different subdomains, you’ll must arrange three separate knowledge sources.
Looker Studio presently helps 760+ knowledge sources. Under are the most well-liked sources:
Prime Google Looker Studio Knowledge Sources
- Google Analytics
- Google Adverts
- Google Search Console
- BigQuery
- YouTube Analytics
- PostgreSQL
- Search Adverts 360
- Show & Video 360
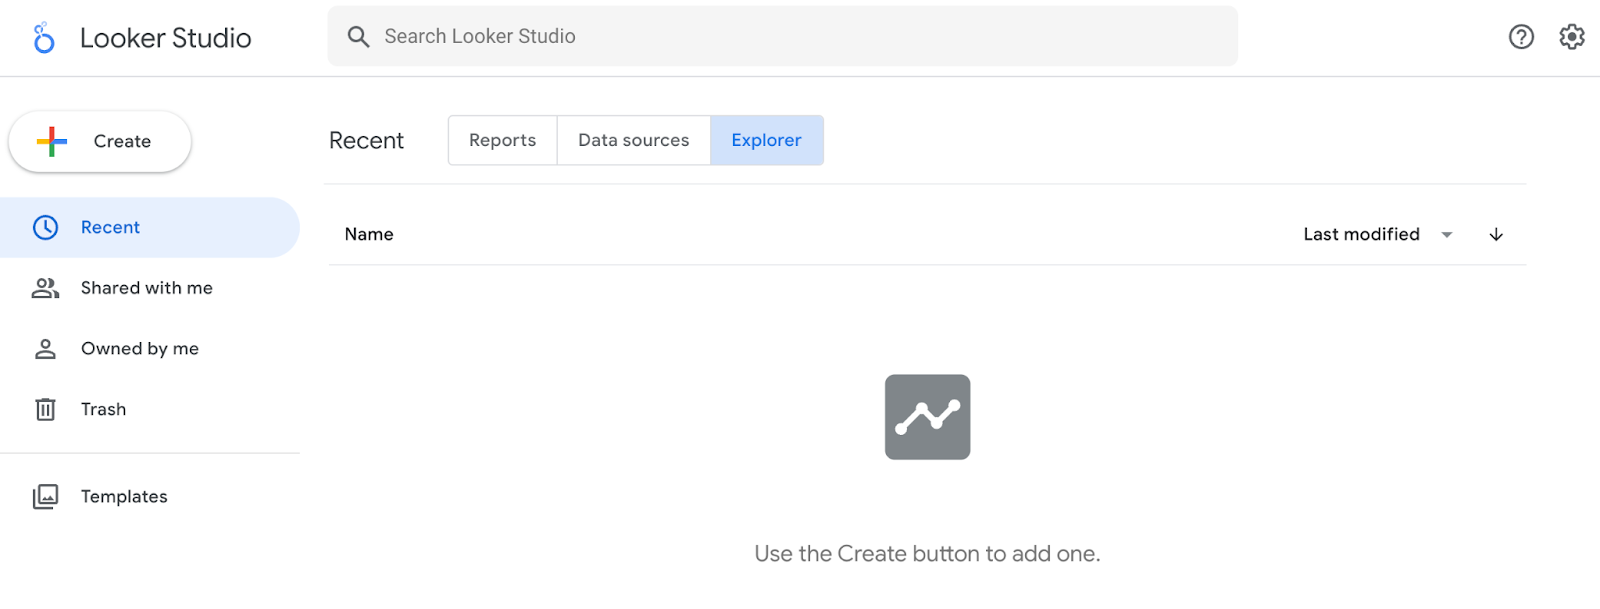
Explorer
Explorer is an experimental device that allows you to experiment or tweak a chart with out modifying your report itself.
For example, let’s say you’ve created a desk in Looker Studio that exhibits the highest touchdown pages by conversion fee. Whereas this desk, you assume, “Huh, I ponder what I’d discover if I added common web page load time.”
You don’t wish to edit the chart within the report, so that you export it into Explorer — the place you possibly can tweak it to your coronary heart’s content material. If you happen to determine the brand new chart is efficacious, it’s straightforward to export it again into the report.
Template Gallery
The template gallery is a set of templates and examples you should use relying on your enterprise wants.
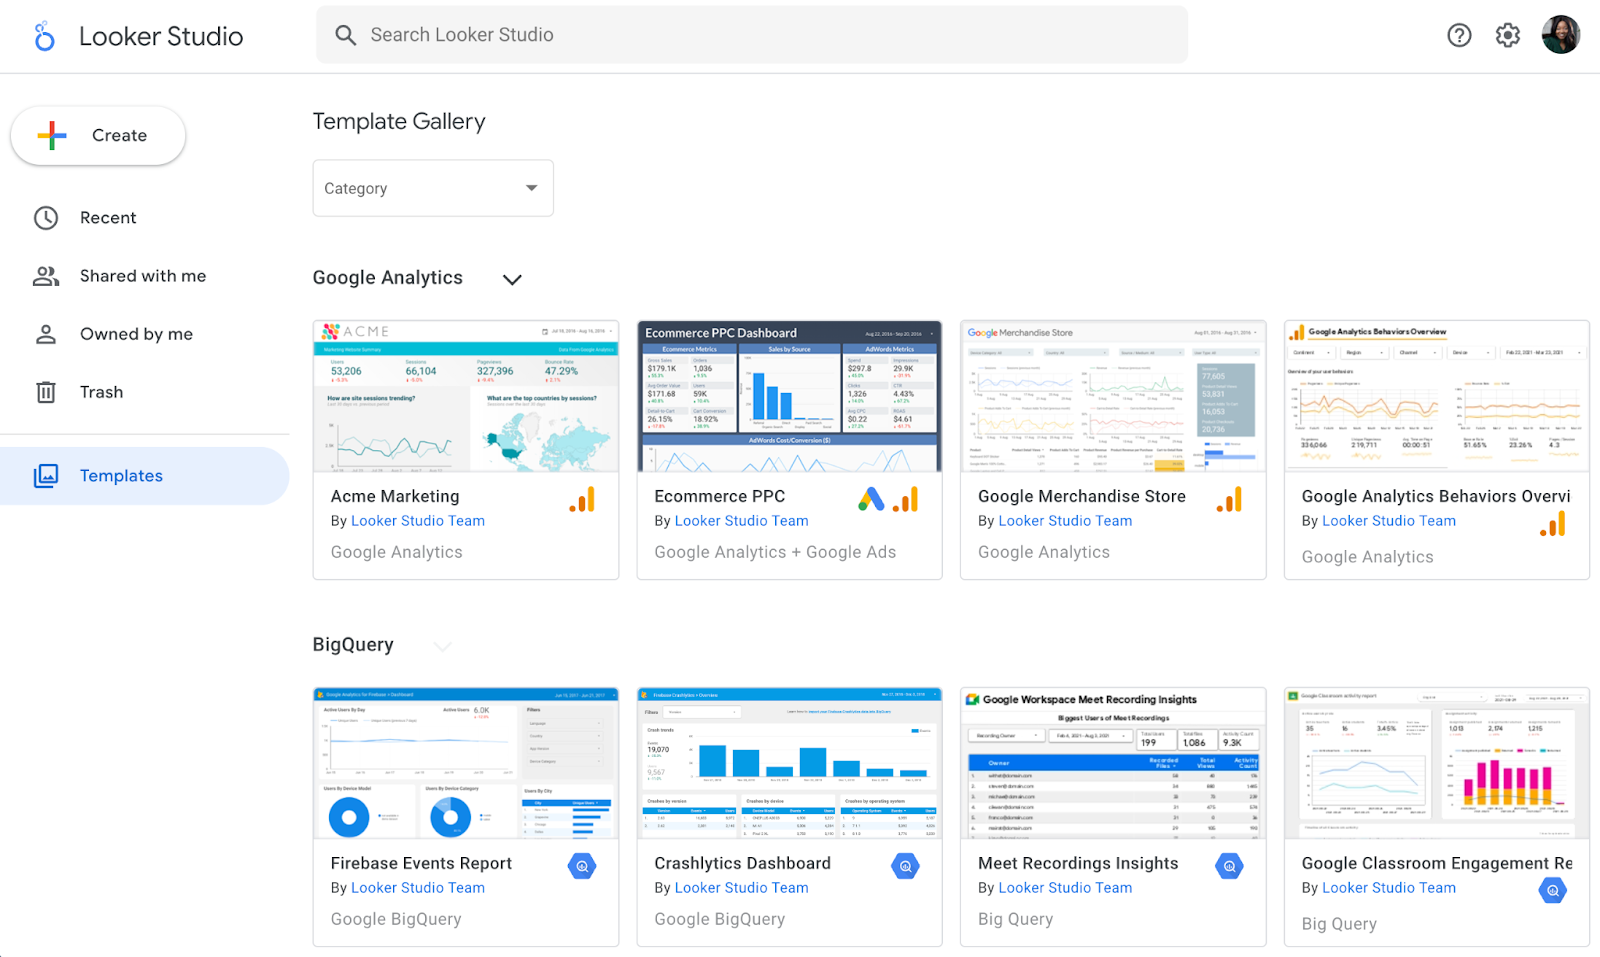
For example, if you happen to run an ecommerce retailer, the ecommerce income template could be very helpful.
Google Looker Studio Tutorial
Join Knowledge Sources to Google Looker Studio
Right here’s a step-by-step information on how one can join knowledge sources to Google Looker Studio.
1. Create an information supply.
Click on “Create” and select “Knowledge supply”.

2. Use Google Analytics.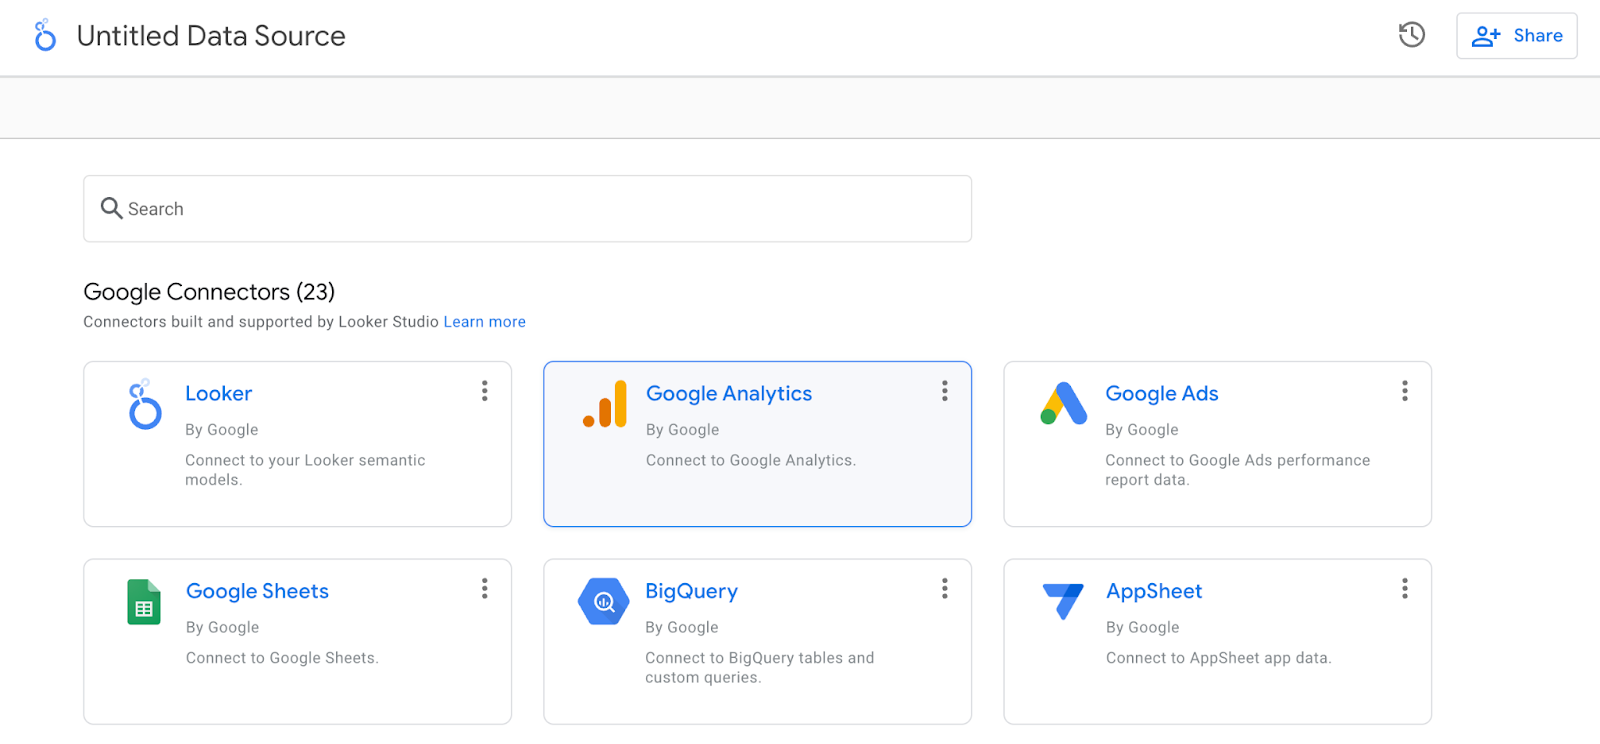
The method is sort of an identical for different sources.
If you wish to comply with alongside precisely with what I’m doing, join the Google Analytics Demo Account for the Google Merchandise Retailer.
3. Authorize the connection and choose an account.
Subsequent, you’ll be prompted to authorize the connection. When you’ve completed that, you’ll want to pick out an account, property, and look at.

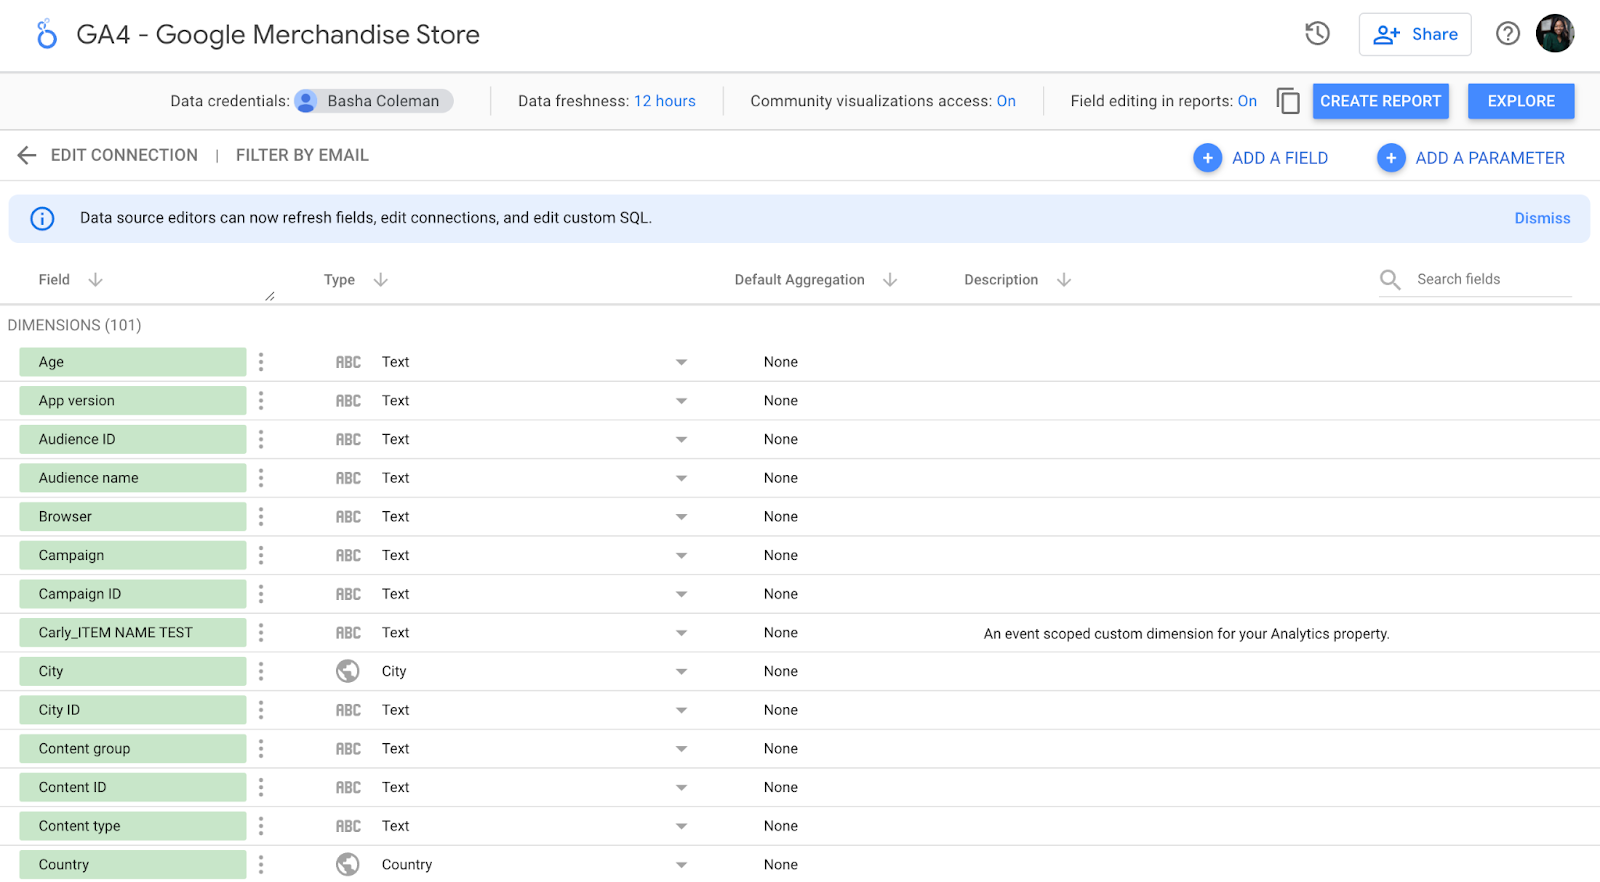
You’ll be offered with one thing just like the view beneath: an inventory of each subject in your Analytics account (each the usual ones and those you’ve added).
Does this really feel overwhelming? Yep, similar right here.
We might do loads on this step — add new fields, duplicate current ones, flip them off, change subject values, and so on. However, in fact, we might additionally do all these issues within the report itself, and it’s a lot simpler there. So let’s try this.
Create a Report in Google Looker Studio
1. Click on “Create Report” within the higher proper.
Looker Studio will ask if you wish to add a brand new knowledge supply to the report; sure, you do.

Right here’s what you’ll see. It’s fairly naked, however not for lengthy!

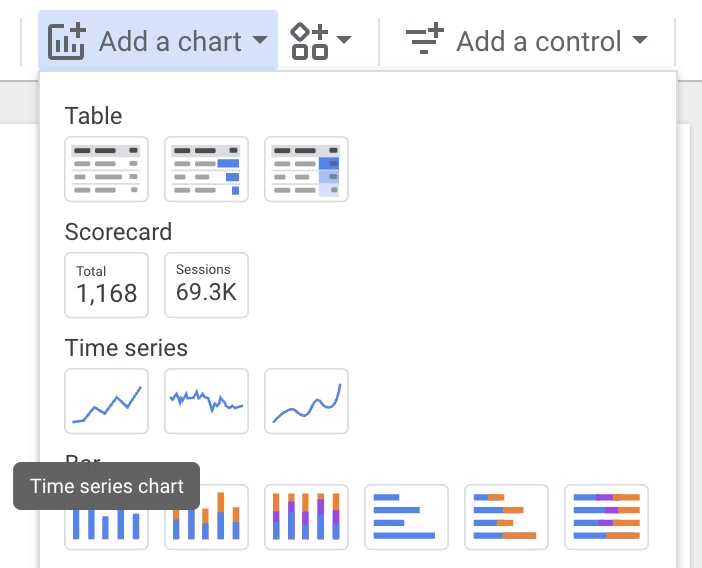
2. Click on “Add a chart” within the toolbar.
It’s time so as to add your very first chart. The excellent news is that knowledge Studio makes it straightforward to check chart varieties with some useful illustrations.
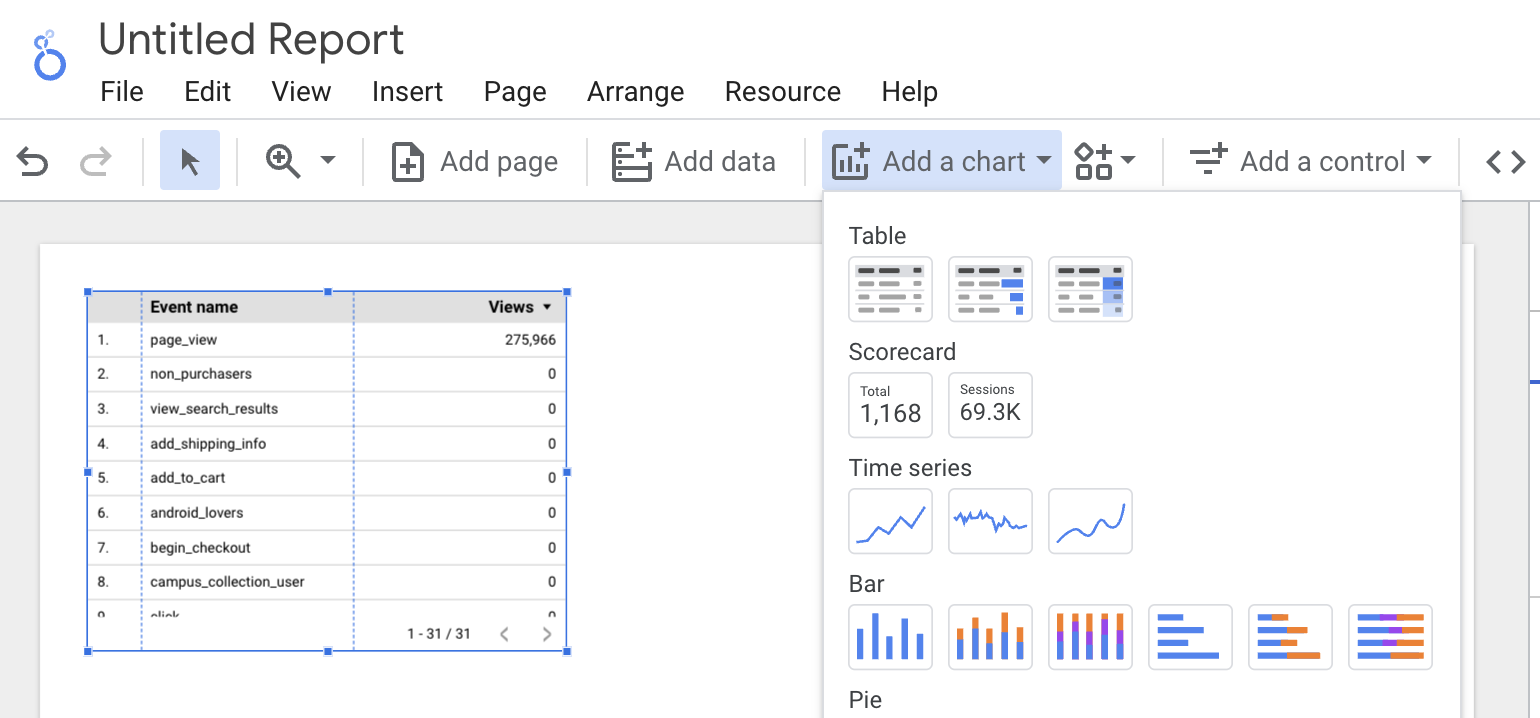
3. Select the primary possibility underneath “Time collection.”
For the aim of this tutorial, we’ll begin with a “Time collection” chart. This chart kind exhibits change over time.
As soon as it seems in your report, the right-hand pane will change. Right here’s what it is best to see:

By default, the dimension is “Date”; you possibly can change this to any of the time-based dimensions, together with “12 months,” “Hour,” and so on.
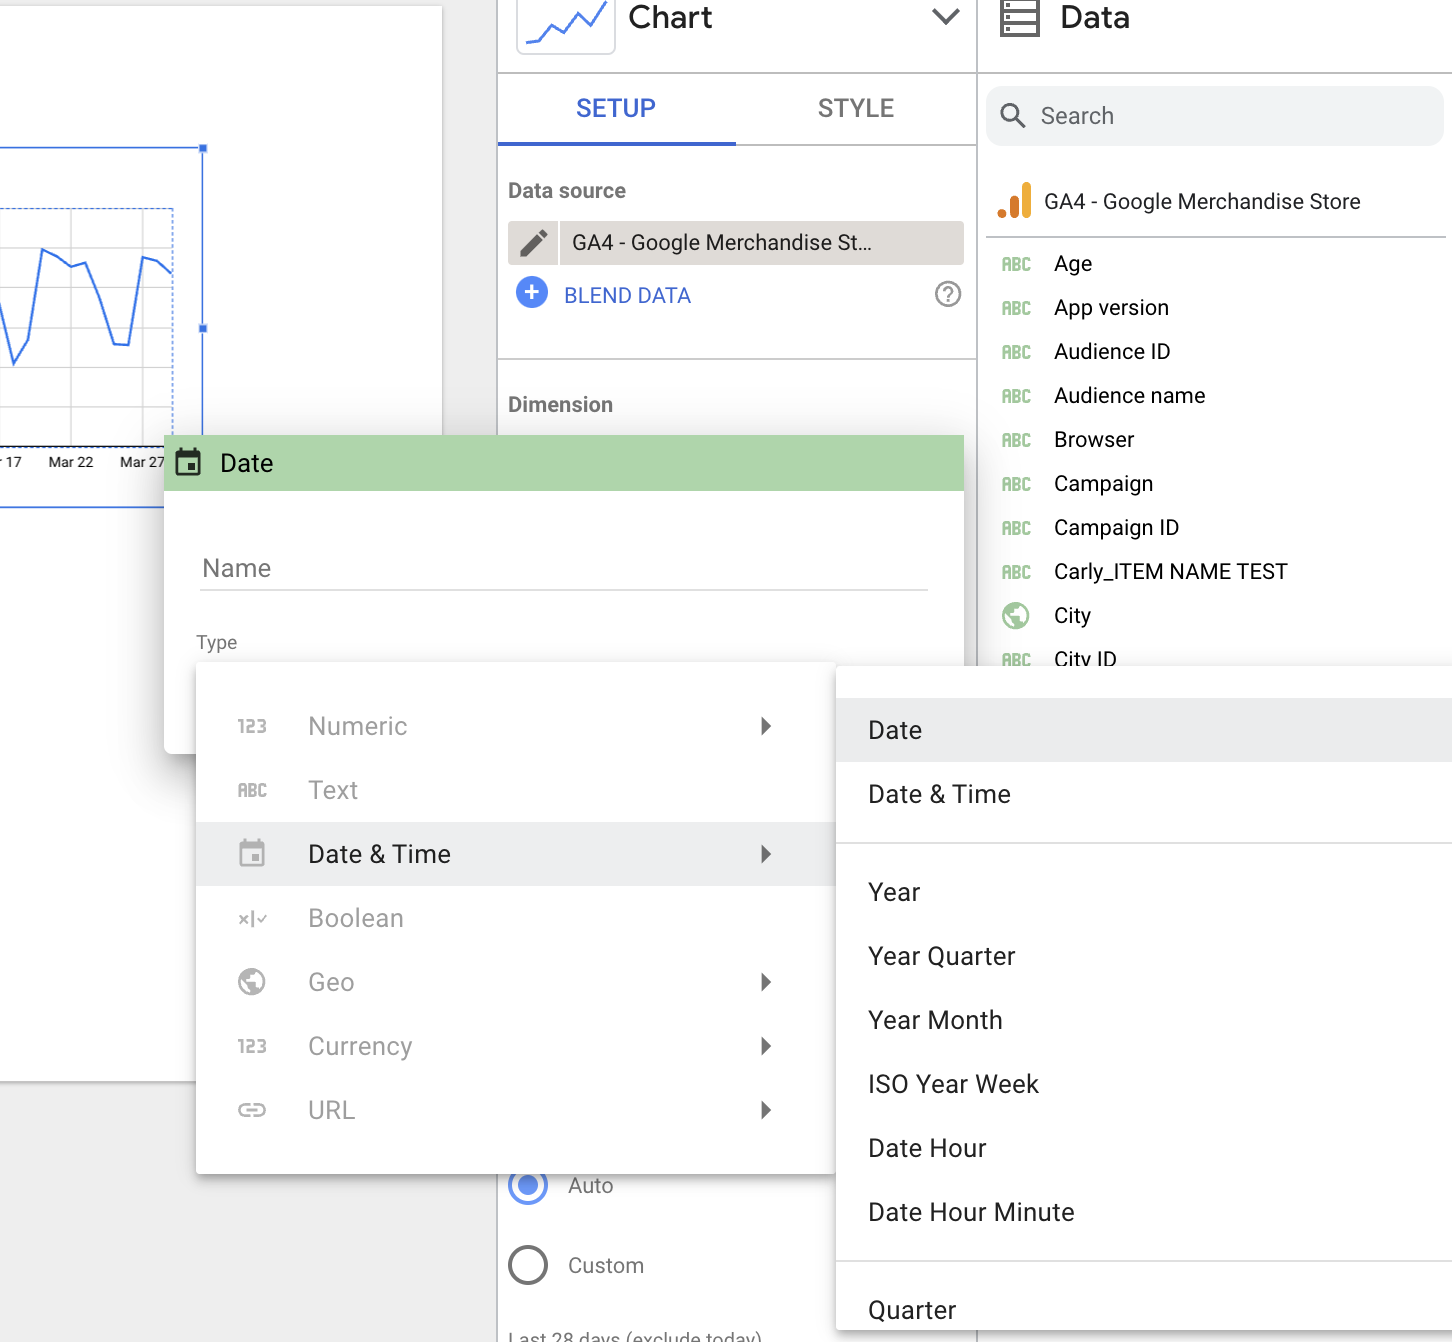
I’ll follow “Date” as a result of the Demo Account doesn’t have a variety of historic knowledge.
Looker Studio will routinely choose a metric (i.e., what’s displayed on the Y-axis) for you. Be happy to alter this; for example, it defaulted to “Pageviews” for me, however I’d reasonably see “Income per person.”
4. Add one other metric.
First, ensure you’ve chosen the chart, so that you see the pane:

You will have two choices for including a metric (or dimension).
You possibly can click on the blue plus-sign icon — which can carry up a search field so yow will discover the sphere you need — or you possibly can drag a subject from the suitable into the metric part.
To delete a metric, merely hover over it together with your mouse and click on the white “x” that seems.

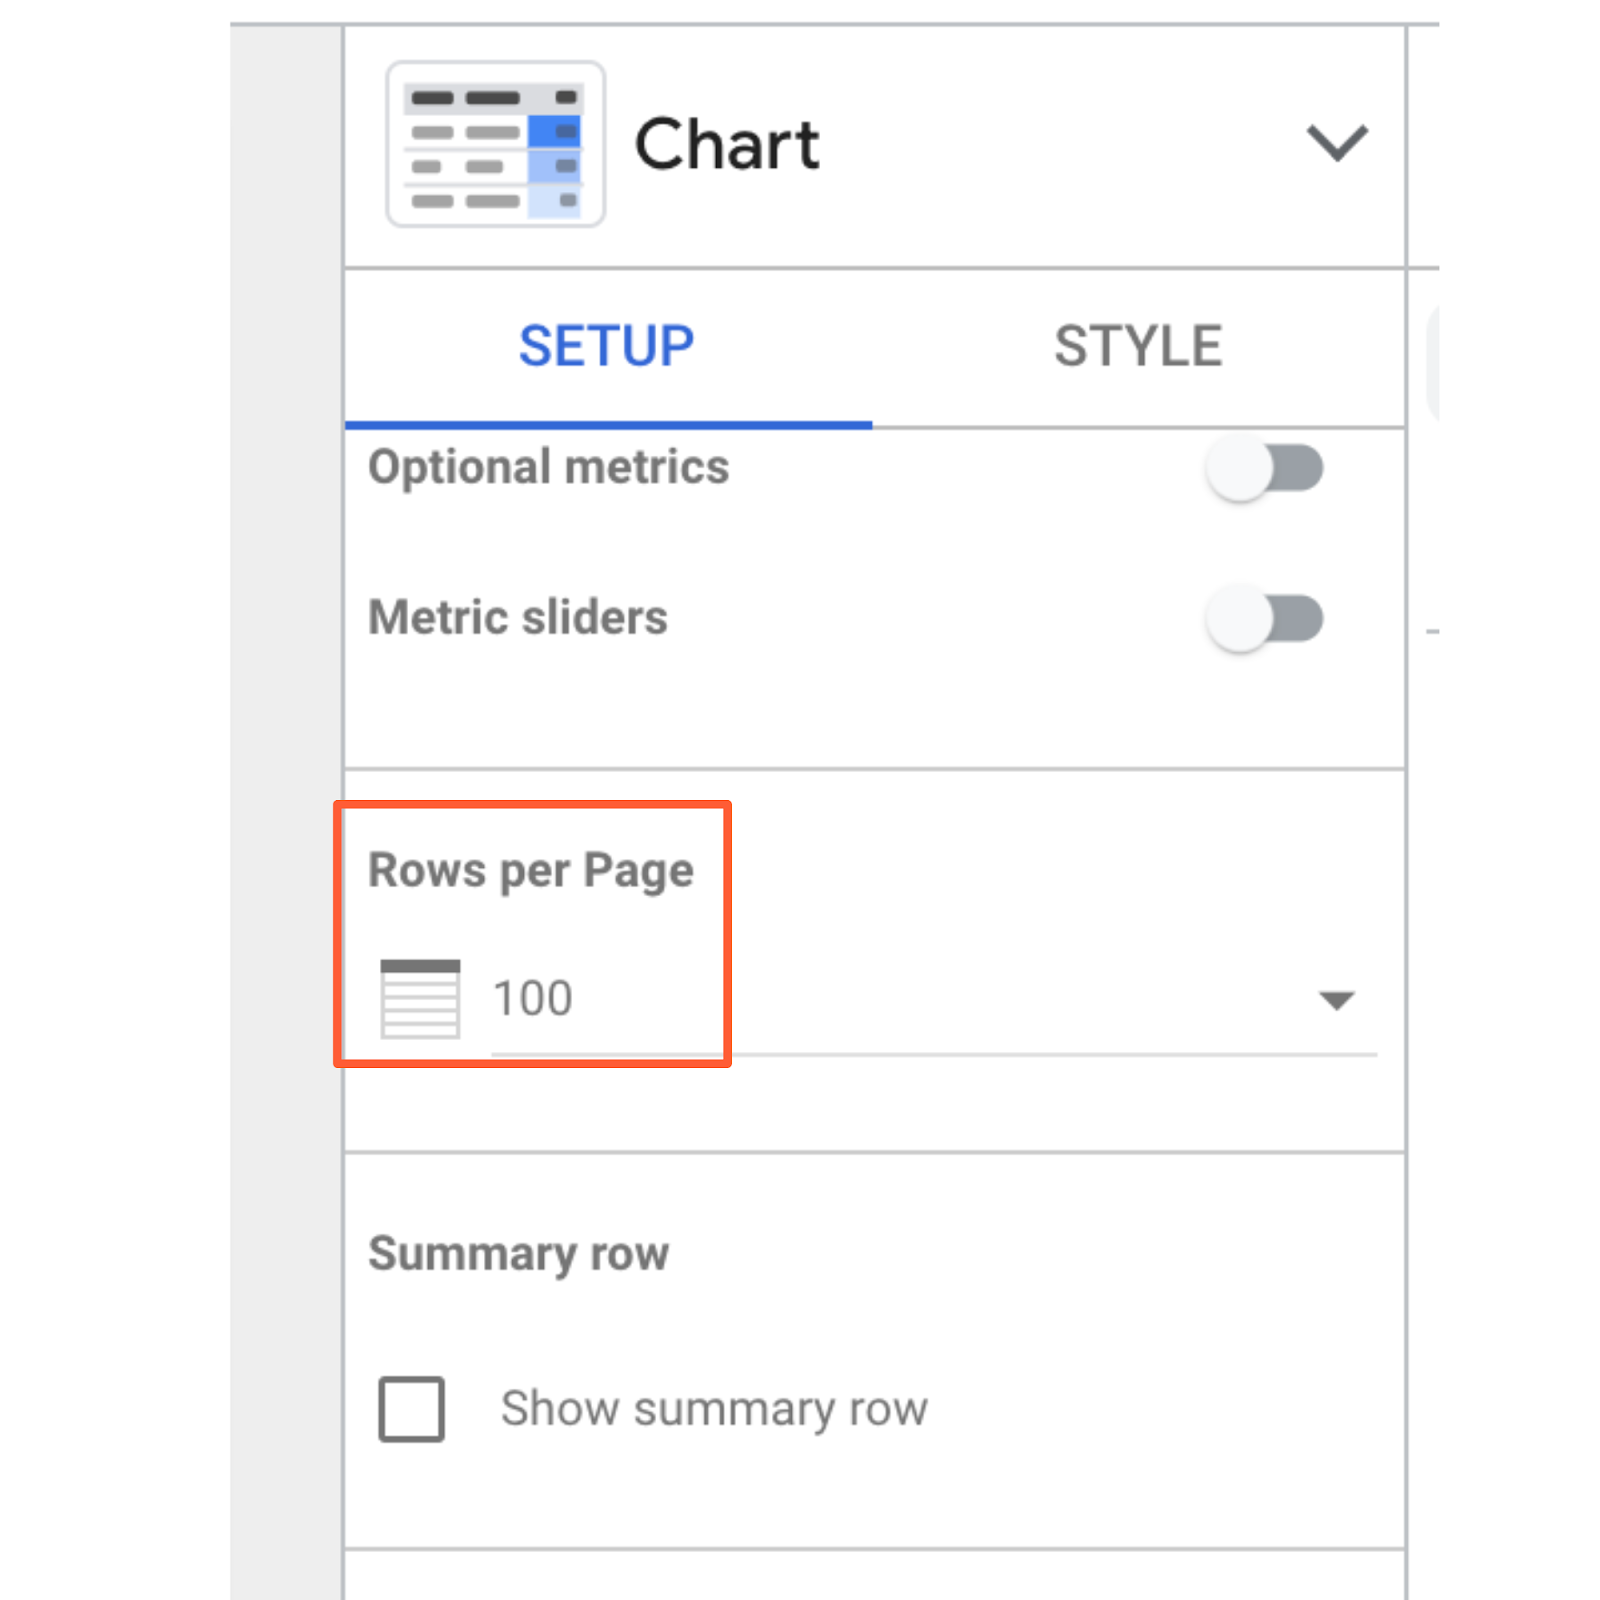
5. So as to add a desk, select the third possibility underneath “Add a chart.”

My chart defaults to Medium (for dimension) and Pageviews (for metric), so I alter it to Product and Distinctive Purchases.
And I believe this desk’s formatting might use some work.
Change the “Rows per web page” from 100 to twenty (a lot simpler to learn) and examine the field for including a Abstract row.
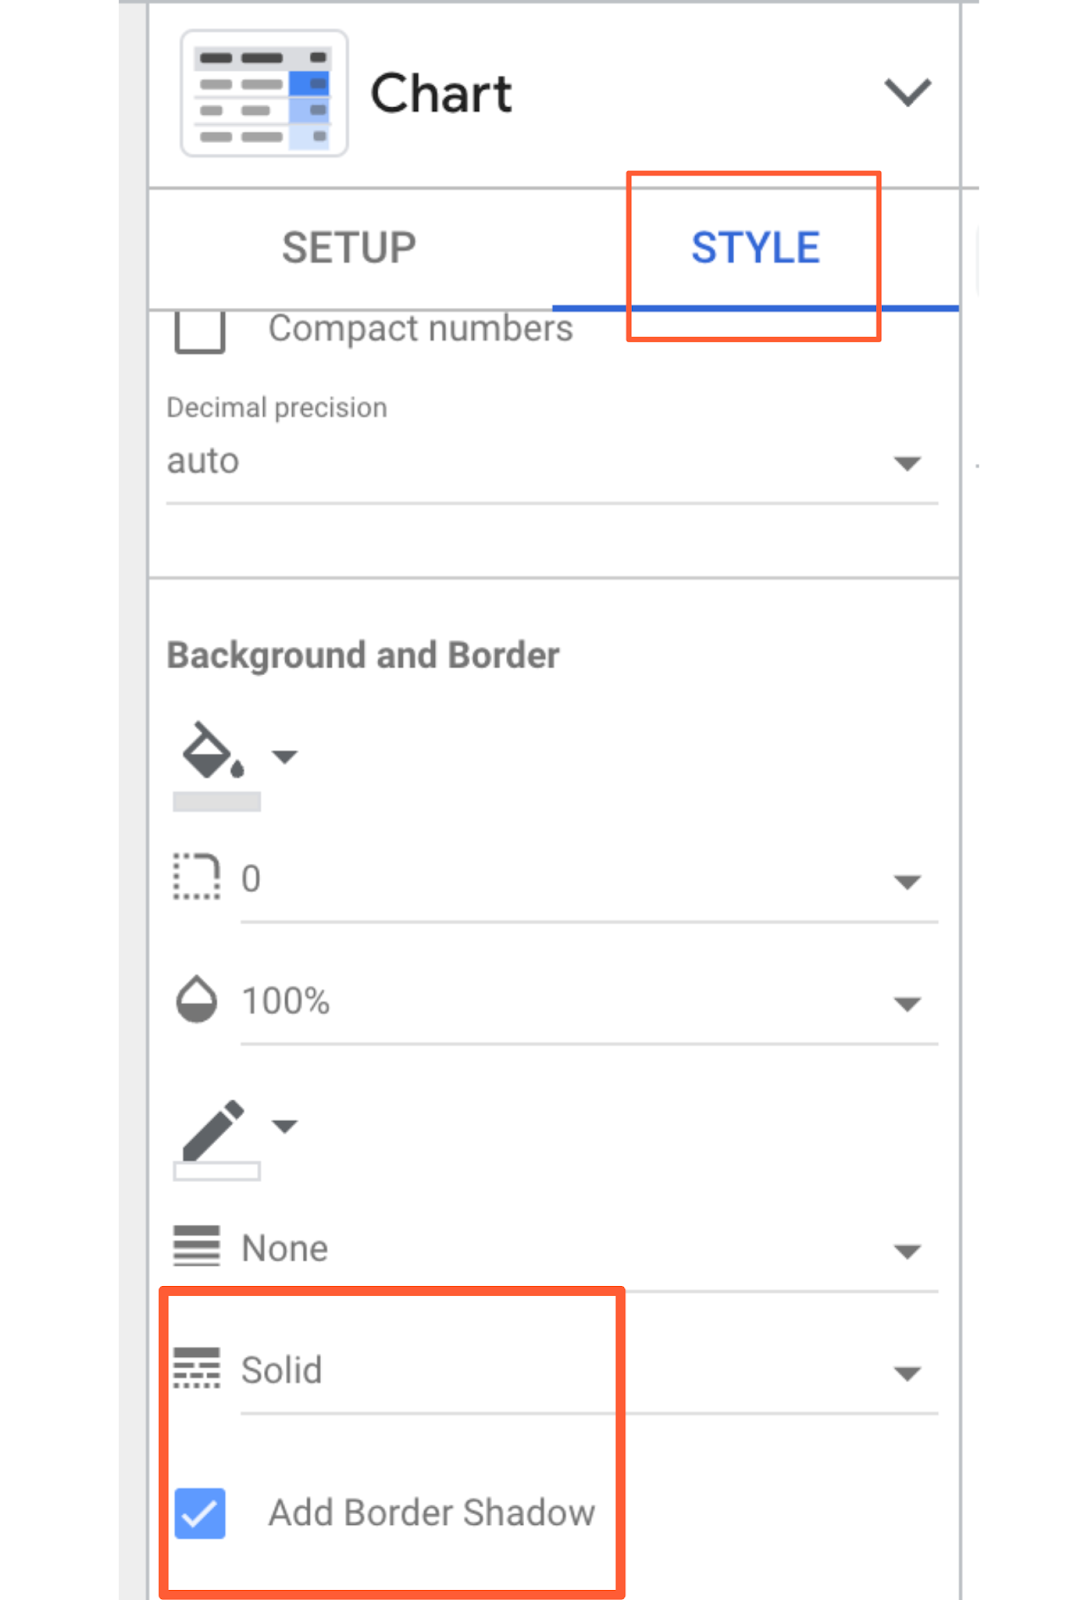
6. Lastly, click on “Fashion” to go to the type tab.
Scroll down and choose “Add border shadow.” That is one among my favourite methods to make an information visualization pop off the web page.
7. To see the completed product, click on “View” within the prime nook.
This transitions you from Editor to Viewer mode.
Voila!
8. Click on “Edit” to complete up and identify the report.
Double-click the title (proper now, it’s “Untitled Report”) to alter it.
And with that, your first Google Looker Studio report is full. Click on that acquainted icon above the Chart Editor and add some e mail addresses to share your report.
Okay, don’t share the report simply but—I’m about to disclose the secrets and techniques that’ll assist you to severely improve it.
Newbie Google Looker Studio Ideas
1. Use templates.
There’s no must reinvent the wheel. If you happen to’re undecided the place to start out with Looker Studio, I like to recommend shopping by their templates for inspiration.
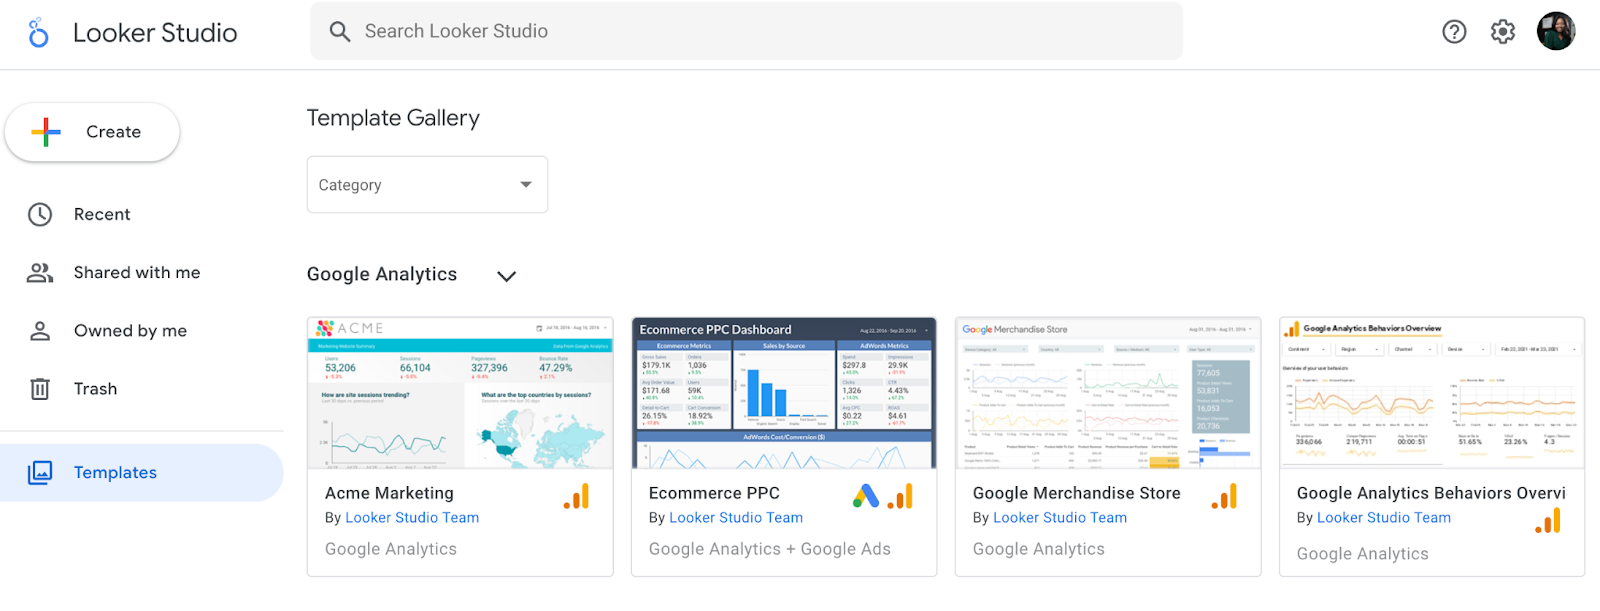
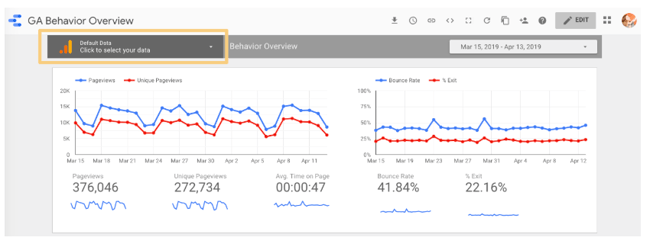
Take note of the report’s creator. Many templates had been constructed by the Looker Studio crew; yow will discover all of them within the “Advertising and marketing Templates” part. However there are additionally 45+ person submissions positioned within the “Neighborhood” part. A number of of my favourite templates:
- GA Habits Overview: This dashboard pulls out probably the most related data from the Habits part of Google Analytics
- Paid Channels Combine Report: Use this template to know how your adverts are acting on Fb, Twitter, LinkedIn, search, and extra.
- Web site Technical Efficiency Indicators: Get a fast overview of how your website is performing in real-time, together with JavaScript and 404 errors and web page load instances.
There are additionally a bunch of enjoyable, non-marketing templates within the gallery (discovered within the “Featured” part), like F1: How Vital Is the First Race? and Star Wars: Knowledge from a galaxy far, distant. Undoubtedly have a look if you happen to’re curious to see the total potential of GSD unleashed.
2. Publish your report.
Wish to showcase your superior analytics and knowledge visualization expertise to the world? Submit your report back to this gallery utilizing this Google type.
Learn over the full directions at this hyperlink, however right here’s what I’d take into accout:
- Don’t share delicate data. I like to recommend making a report with publicly accessible knowledge, so there’s completely no likelihood you get in bother for sharing knowledge you don’t personal. (Professional tip: recreate one among your current firm stories with dummy knowledge from one among Google’s pattern knowledge units!)
- Make it superior. The general public stories are spectacular, so don’t maintain again with design, options, and so forth.
- Add context. Present on-page explanations of what you’re measuring or monitoring with captions, directions, perhaps even a video of you strolling by the report.
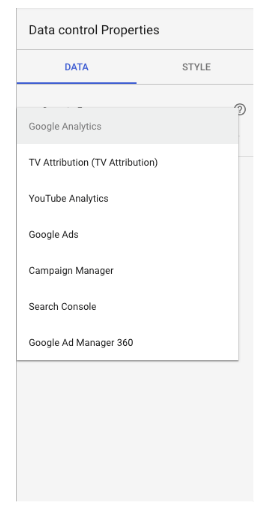
3. Connect with 760+ knowledge sources.
As I discussed, you possibly can carry knowledge from Google-owned sources into Looker Studio, together with Search Console, Google Adverts, YouTube, and Marketing campaign Supervisor.
However that’s simply the tip of the iceberg. There are additionally greater than 120 accomplice connectors — primarily, third-party bridges between Looker Studio and platforms like Adobe Analytics, AdRoll, Asana, Amazon Adverts, and AdStage (and that’s simply the As).
Take a look at all of the choices right here.

4. Create your personal report theme.
Whether or not your report is supposed for inner stakeholders, just like the management crew, or exterior ones, like purchasers, it’ll be simpler if it seems to be good.
To regulate the report’s type and formatting, click on the Format and theme possibility within the toolbar.
Any modifications right here will apply throughout the report—which means you solely want to choose fonts, colours, and so on., as soon as versus each time, you add a brand new module to the report.

Looker Studio comes with two built-in themes: easy and easy darkish. However it’s straightforward to create your personal — and the outcomes are far more spectacular.
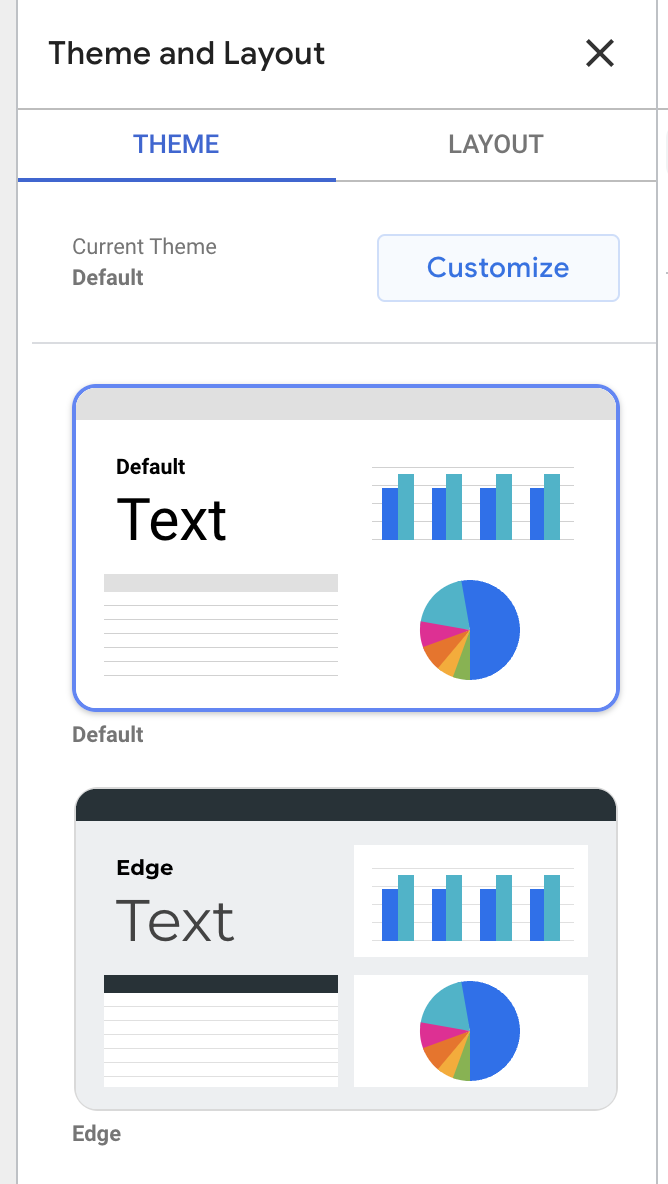
Click on on “Customise.”
Use your model type information to decide on major and secondary colours, fonts, and textual content colour. You may must get artistic right here; HubSpot makes use of Avenir Subsequent, which Looker Studio doesn’t supply, so I went with its cousin Raleway.
If you happen to’re making a report for a consumer and don’t know their hex codes, Seer Interactive’s Michelle Noonan has a wonderful tip: use a free colour picker device to determine what they’re utilizing on their web site.
You can too create a customized chart palette on this tab and edit the border and background settings.
5. Embed exterior content material.
Identical to you possibly can carry your report back to the broader world, you can too carry the broader world to your report.
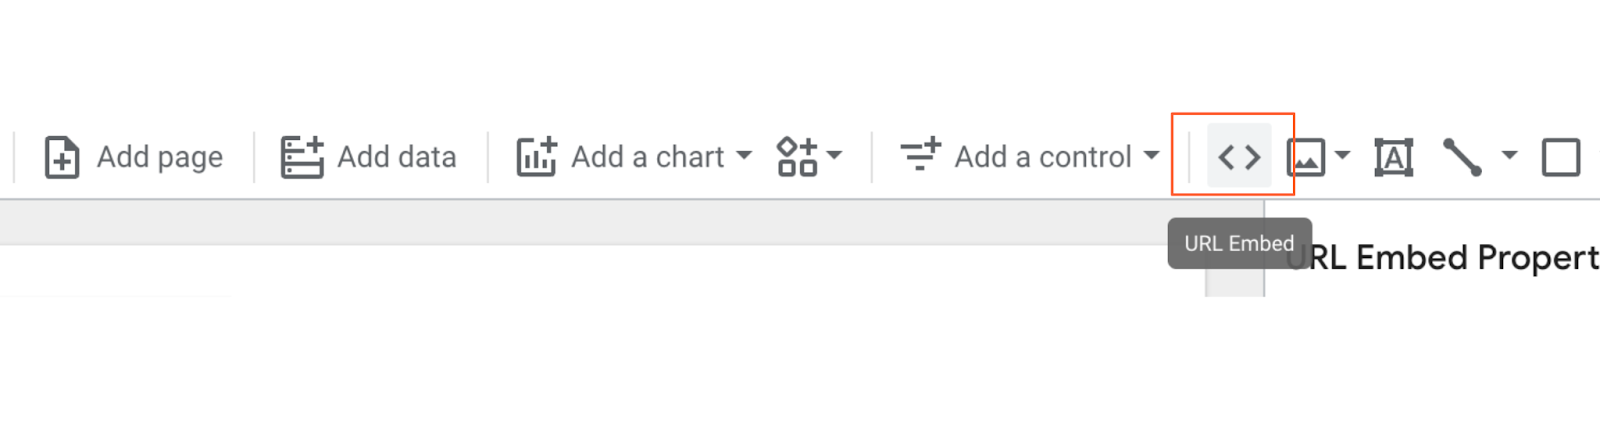
You possibly can insert Google Docs, Google Sheets, YouTube movies, and even stay webpages with the URL embed characteristic. Embedded content material is interactive, so it’s way more highly effective than a screenshot.
Click on “URL embed.” within the navigation bar so as to add content material.
From there, merely paste the URL. Subsequent, chances are you’ll must resize the field that seems to suit your content material’s complete size and width.
The choices listed below are fairly infinite. Certainly one of my favourite methods to make use of this characteristic is to embed a Google Kind gauging how useful the report was for my viewers:
If a bit of the report wants additional context (or my viewers aren’t that technical), I’ll add a brief video explaining what they’re and how one can interpret the outcomes.
To personalize a report for a consumer, I’ll add the URL of their web site, weblog, and/or no matter pages they employed me to create or enhance.
And for the HubSpot running a blog crew, I’ll add the newest model of the Search Insights Report to allow them to examine our progress to the outcomes.
6. Ship scheduled stories.
You probably have a gaggle of stakeholders that must see your report frequently, think about using Looker Studio’s “scheduled report” characteristic.
Click on on the drop-down menu beside the “Share” button and choose “Schedule e mail supply.”
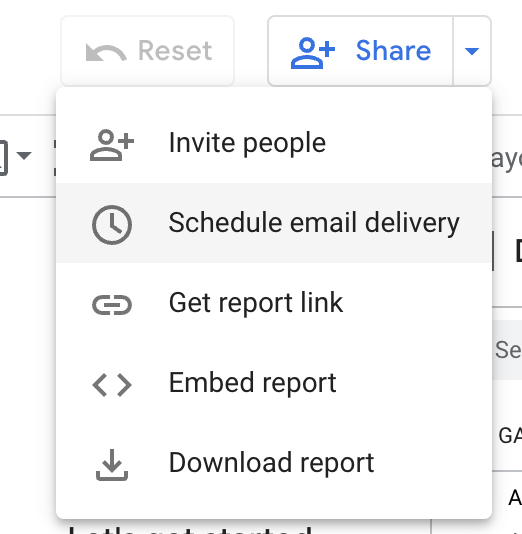
First, enter your recipients’ e mail addresses, then select a schedule, whether or not every day, each Monday, or each month.
That is notably useful when working with clients, since chances are you’ll not wish to give them entry to the stay report.
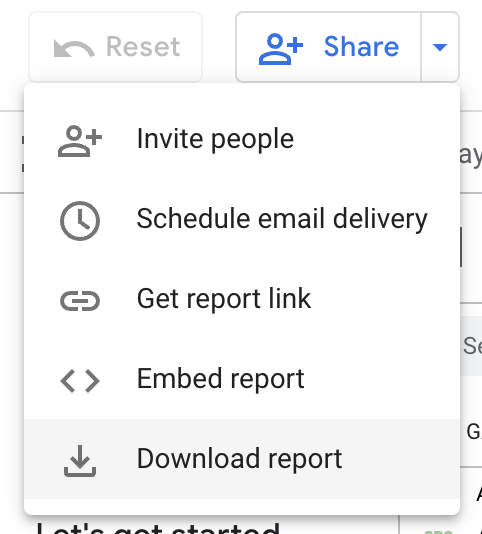
7. Obtain the report as a PDF.
Alternatively, you possibly can obtain your report as a PDF. That is useful for one-off conditions, like in case your boss asks for a standing report or your consumer desires to understand how an advert has carried out to date this month.
To obtain the file, click on “obtain” on the drop-down menu.
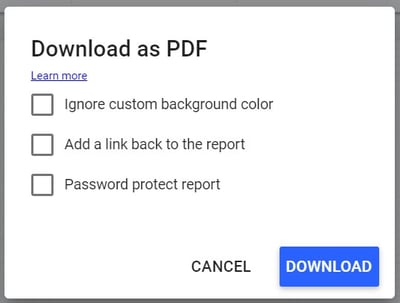
Looker Studio offers the choice of downloading your present web page or the complete report. You possibly can even add a hyperlink again to the report so your viewers can dig in deeper in the event that they’d like and add password safety to make sure your knowledge stays secure.
Intermediate Google Looker Studio Ideas
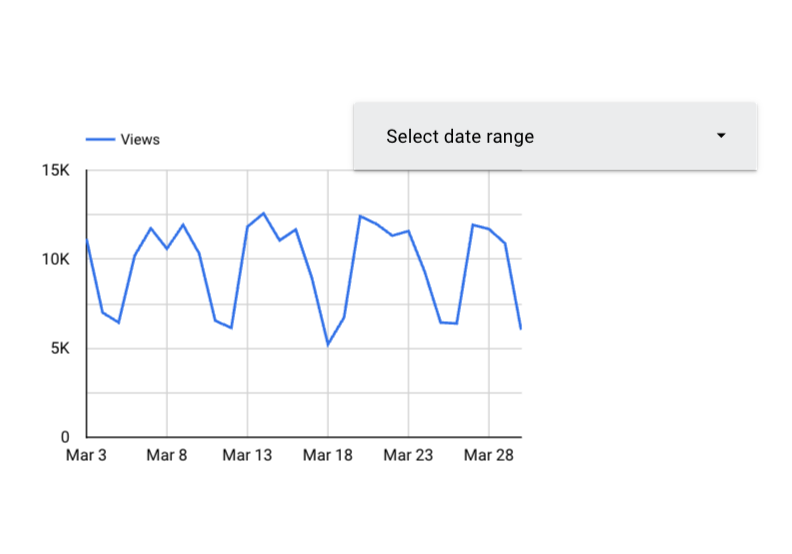
7. Add a date vary.
Give your viewers extra freedom by letting them choose which dates they’d prefer to see data for.
For instance, my stories all the time default to the final 30 days, but when one among HubSpot’s weblog editors desires to see how their property carried out within the earlier calendar month, the date vary controls allow them to regulate the report.
They’ll select from predefined choices, like “yesterday,” “final seven days,” “12 months thus far,” and so on., or choose a customized interval.
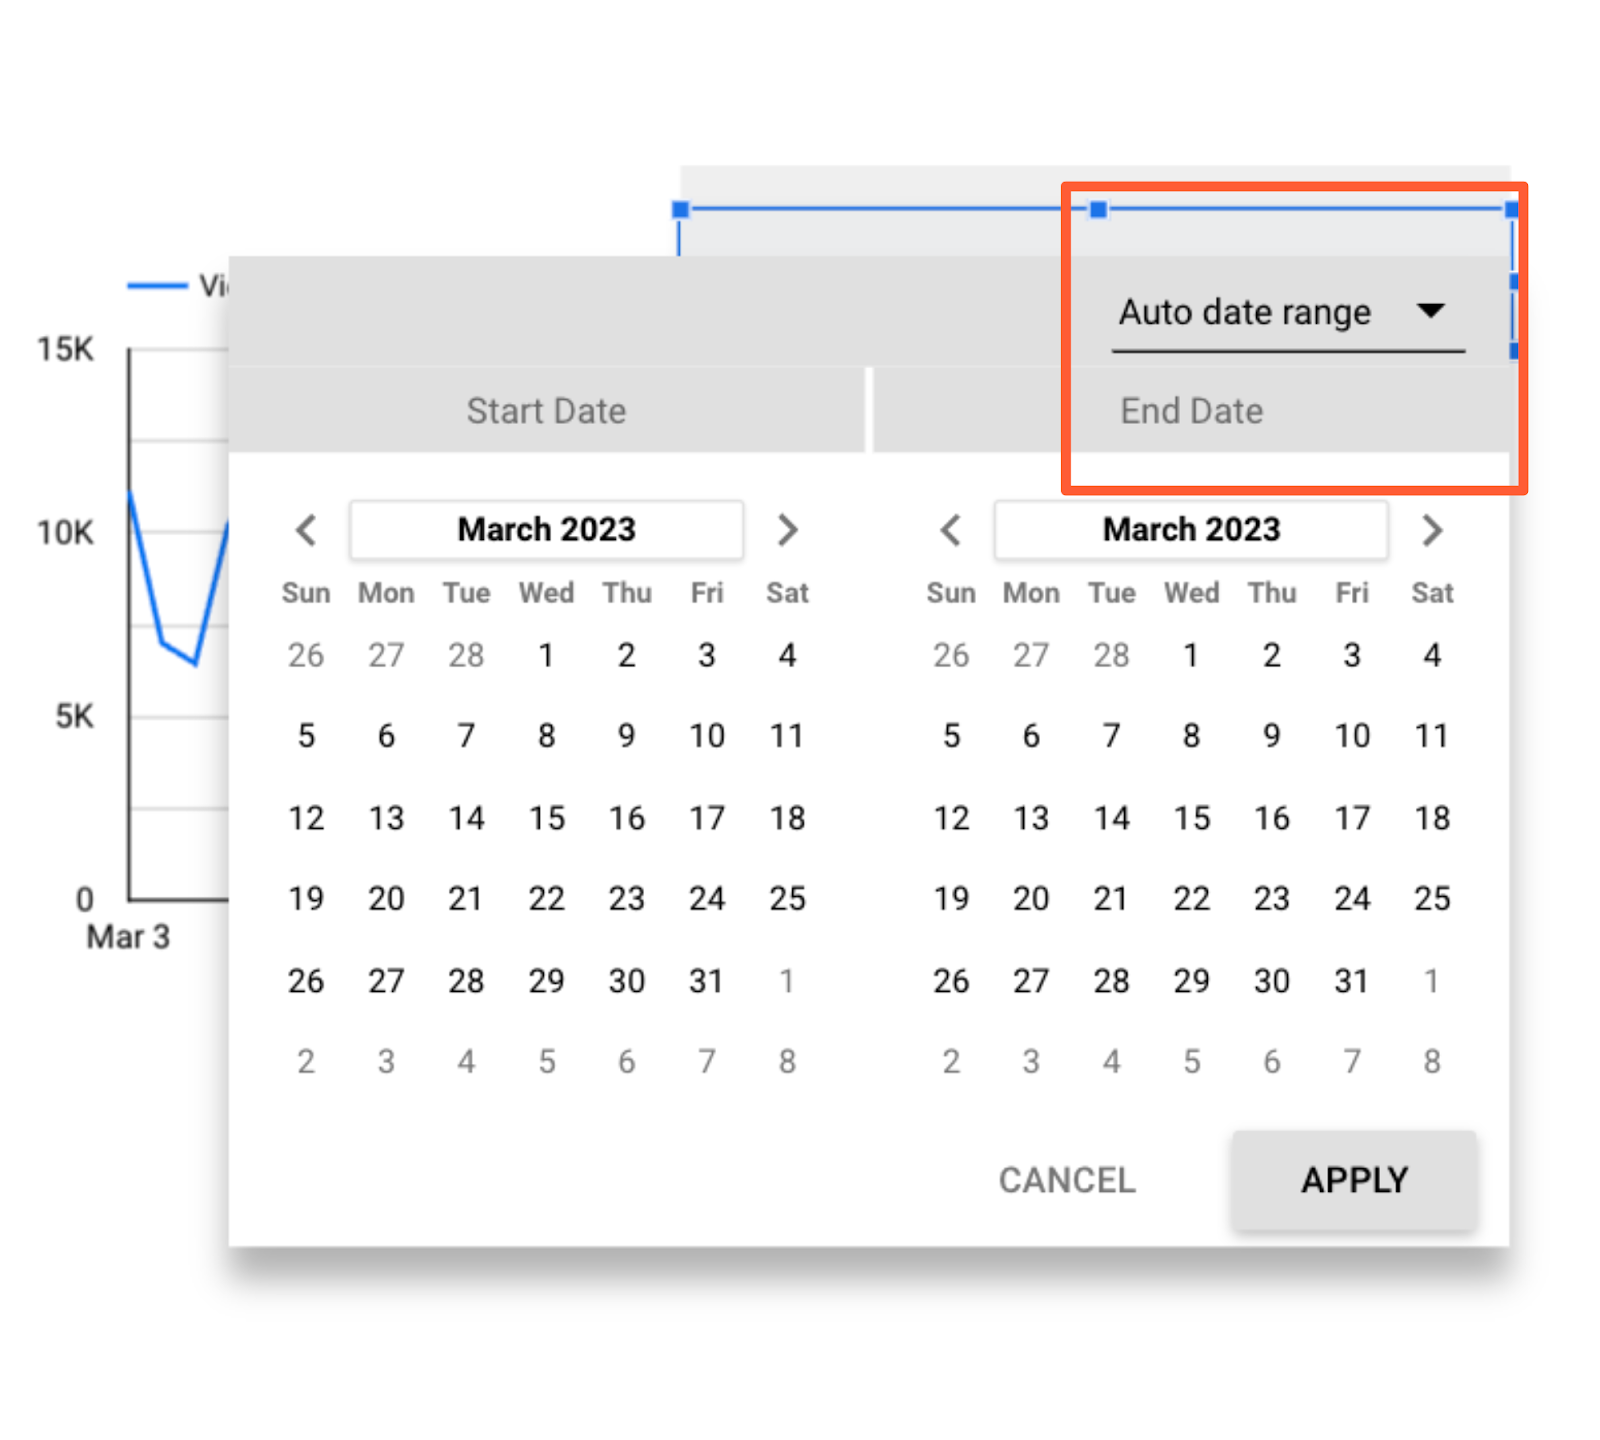
To allow this, first navigate to the web page you wish to give customers date management. Subsequent, click on on the drop-down menu by “Add a management.” Subsequent, click on “Date vary” from the toolbar.

A field will seem in your report. Drag it into the place you need — I like to recommend someplace within the higher proper or left nook, so your viewers sees it first — and regulate the dimensions if vital.
Clicking this module will carry up a panel on prime of your report referred to as Date Vary Properties. Set the default date vary to “Auto date vary,” if it isn’t already.
In case your viewers choose a date vary utilizing the date vary widget, each report on the web page will routinely replace to that interval.
There are two methods to override this:
- Set a time interval inside a selected chart. That point interval will all the time supersede the date vary management.
- Group the charts you wish to be affected by the date vary management with the module. Choose the chart(s) and the field, then select Prepare > Group.
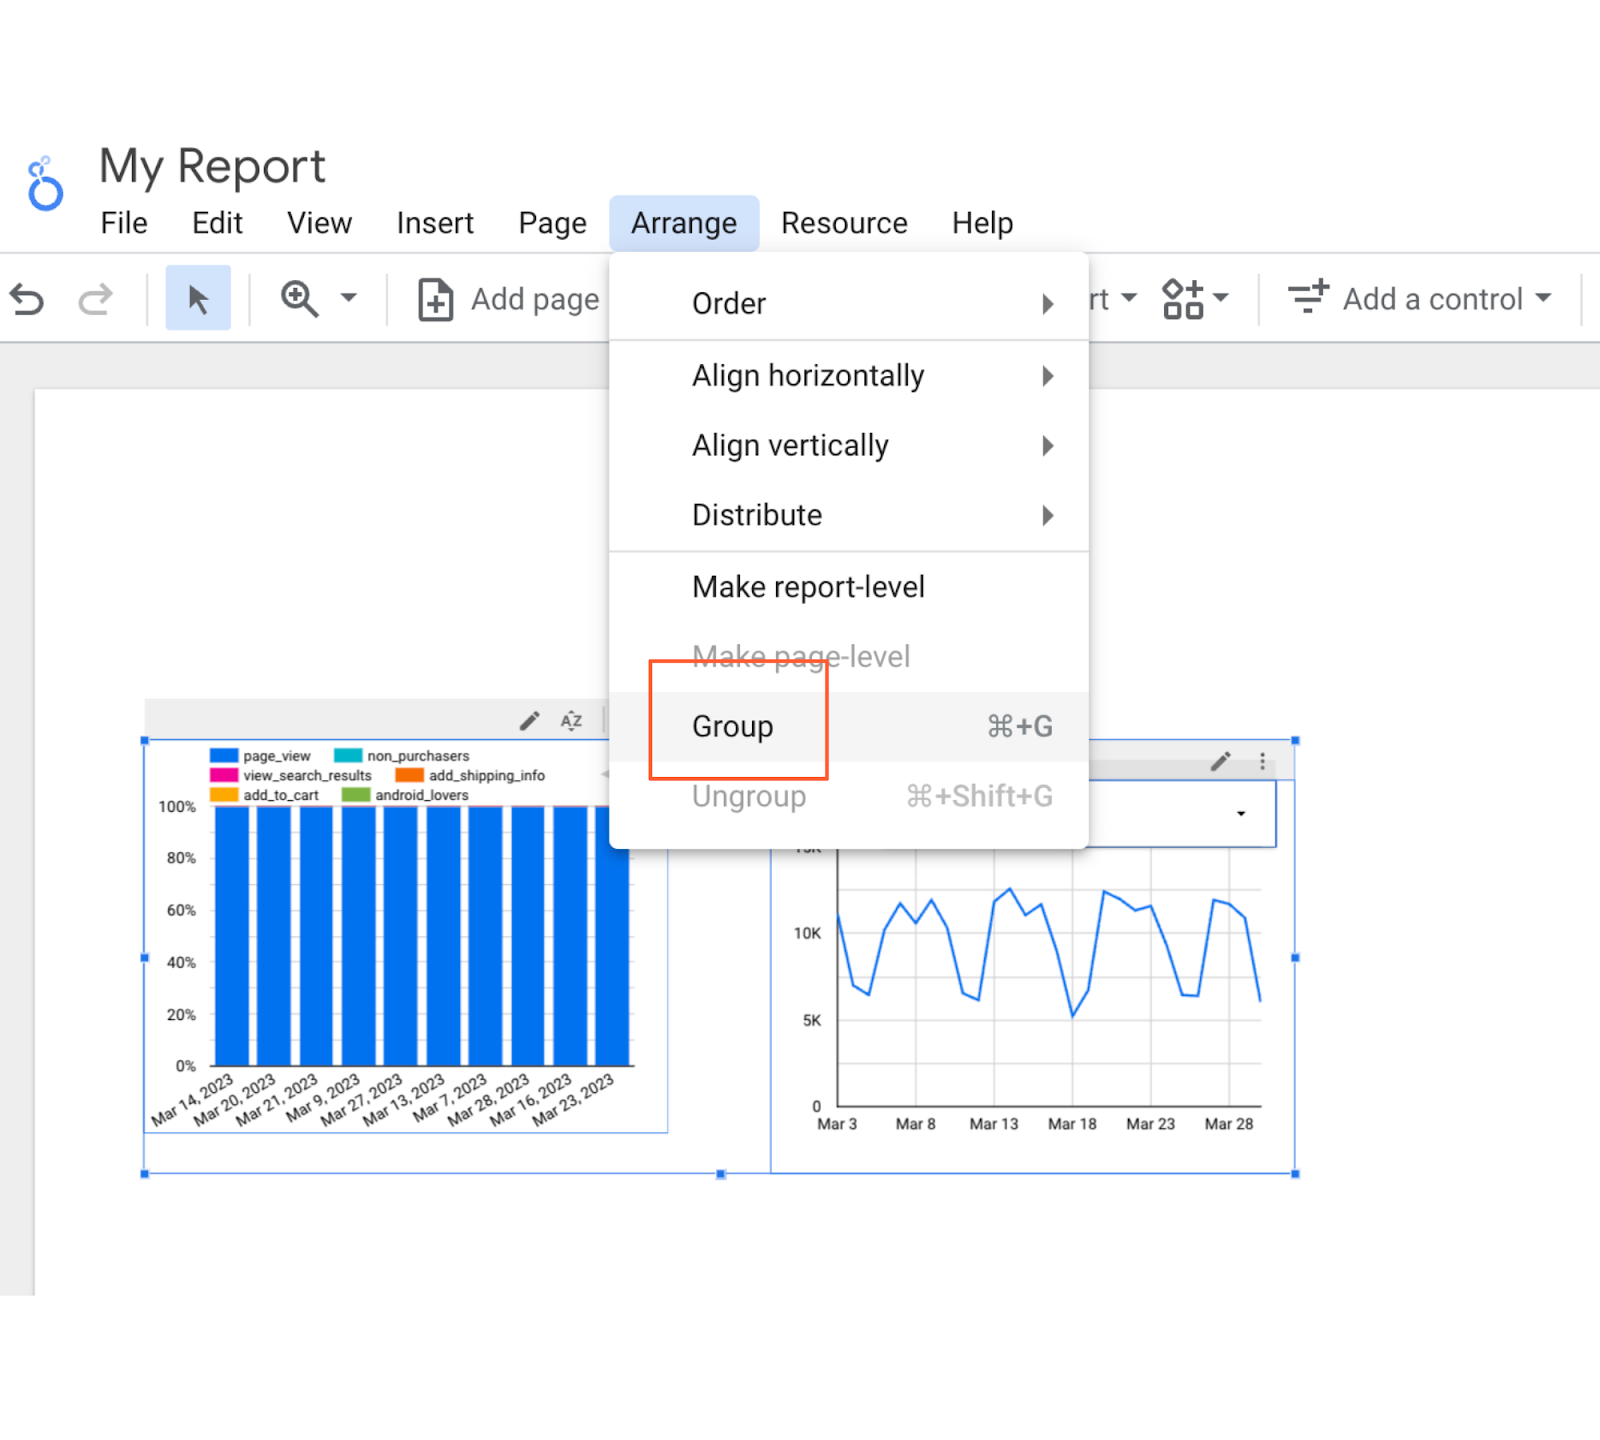
Now, solely the chart(s) on this group will replace when somebody adjusts the date vary.
Make sure that this setting is obvious to your viewers — in any other case, they’ll in all probability assume all of the charts they’re on their present web page are utilizing the identical time interval.
8. Create interactive chart filters.
Wish to make it even simpler on your viewers to filter the charts in your report? Create responsive chart filters.
This sounds fancy, nevertheless it merely means deciding on a dimension in a chart will filter all of the charts on that web page for that dimension.
For example, if you happen to click on on “natural” on this chart, the opposite charts on the web page will replace to indicate knowledge for natural site visitors solely — identical to you’d utilized a standard filter management.

You can too create chart controls for time, line, and space charts. For instance, if a person highlights say, January by March on a time chart, the opposite charts on the web page will present knowledge for January by March as effectively — identical to date vary management.
And likewise, identical to filter controls, you possibly can group chart controls.
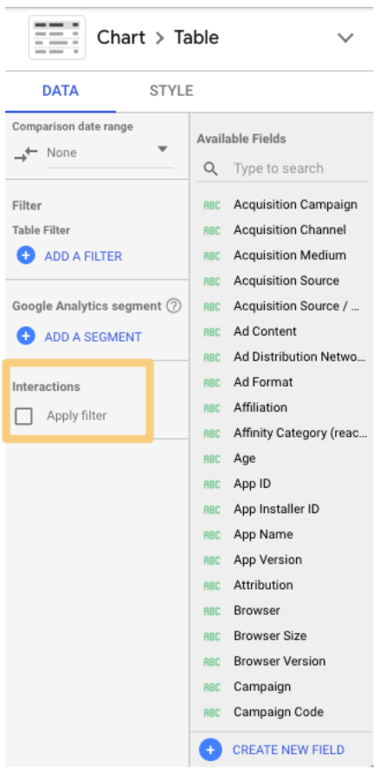
To allow chart management, choose the suitable chart. Within the right-hand panel, scroll to the underside and examine the field labeled “Apply filter.”
Add a caption subsequent to charts that assist interactive filtering, so your viewers comprehend it’s an possibility:

9. Add an information management.
Knowledge controls may be one of many coolest Looker Studio options, full-stop. Place one among these dangerous boys in your report, and also you’ll give viewers the power to decide on the supply of the information being piped into your charts.
This can be a game-changer for anybody managing a fancy property or working with a number of stakeholders.
For example, think about you’re the admin of HubSpot’s Google Analytics account. You create a Looker Studio report monitoring key web site efficiency indicators, like common web page pace, variety of non-200 response codes, variety of redirect chains, and so forth.
You share this report with the running a blog crew, who has entry to the Google Analytics view for weblog.hubspot.com. (Want a refresher on how views and permissions work? Take a look at our final information to Google Analytics.)
You additionally share the report with the Academy crew, who has entry to the GA view for academy.hubspot.com, and the Leads Optimization crew, who has entry to affords.hubspot.com.
To see this report populated with the related knowledge, these groups merely want to pick out their view from the “knowledge supply” drop-down, and voila — all of the charts will replace routinely.
Fairly nifty, proper?
Not solely does this prevent from rebuilding the identical report for various teams, nevertheless it additionally means you don’t want to fret about unintentionally sharing delicate or confidential data. Every viewer can solely choose knowledge sources they’ve been granted entry to.
You possibly can embody a number of knowledge controls in a single report.
Add the information management widget to your report by clicking this icon:

10. Add a dimension breakdown.
As a substitute of telling you what a dimension breakdown is, it’s simpler to indicate you the way it works.
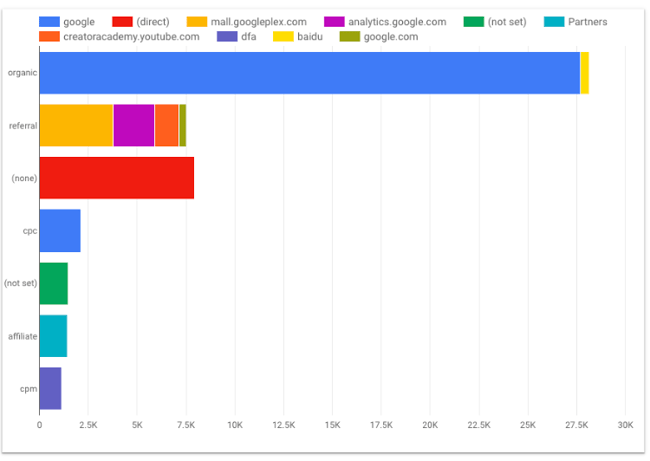
Suppose we wish to see customers by supply. To search out out, we create a easy bar chart.
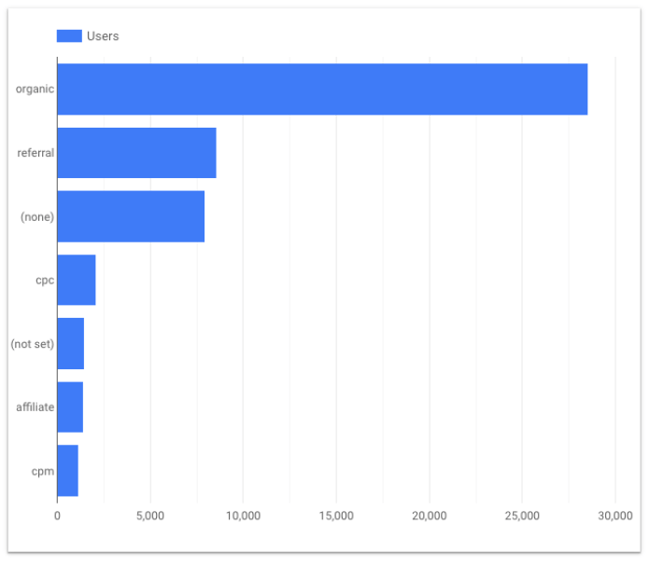
That is fascinating — but there’s some context lacking. For instance, is all of that natural site visitors coming from Google? (Since that is U.S. knowledge, in all probability, however think about creating the identical chart for China or Japan, the place Baidu and Yahoo have a far larger presence.)
What about referral site visitors? Clearly, we’re getting a big variety of customers from referral hyperlinks; is a single supply driving most of them, or is it distributed pretty equally throughout all kinds of sources?
We might create separate bar charts for every supply — first filtering by medium after which making the dimension “Supply” and the metric “Customers.”
Or we might click on a single button and have Looker Studio do it for us.
Below Breakdown Dimension, click on “Add dimension.”
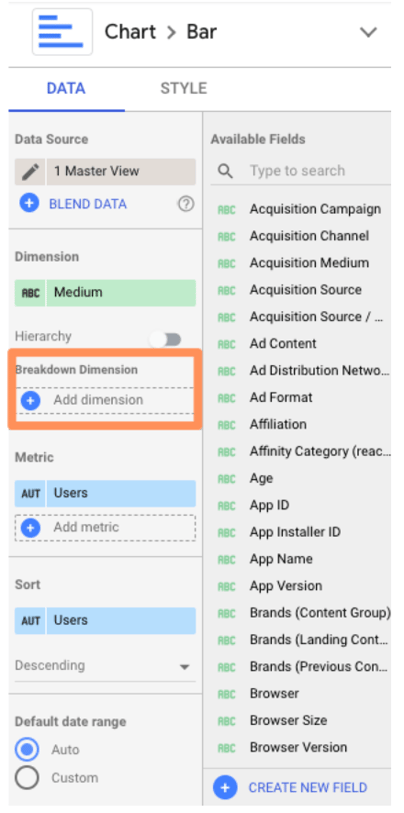
Add “Supply.”
Right here’s what it is best to see:

Fairly positive my former Knowledge Analytics professor would cry if he noticed this. However don’t fear, we’re not completed but.
Leap over to the “Fashion” tab and examine the field “Stacked bars” to show your common bar chart right into a stacked bar chart (it is best to see the chart kind replace accordingly).
Looker Studio will routinely make your bar charts “100% stacking,” which means that each bar will go to the highest of the chart. Nonetheless, this type is deceptive — for instance, right here, it suggests each medium drove the identical variety of customers.
Uncheck this field.

Now test it out:
11. Use Looker Studio Explorer.
To carry any chart into Explorer, mouse over the area subsequent to its top-right nook. You’ll see three vertically-stacked dots seem; click on them.
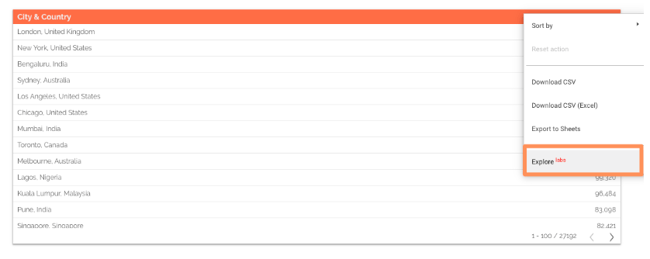
Choose “Discover.”
You’ll see one thing like this:

You possibly can toggle between totally different visualizations; add and take away dimensions and metrics; change the date vary, and apply segments.
Observe: In contrast to each different Google device on the market, Explorer doesn’t routinely save your work.
To protect your chart, click on the “Save” button on the highest nav bar (to the left of your profile icon). When you try this, your Explorer “report” can be saved within the Explorer part of your dashboard. As well as, each change you make can be saved by default.
Talking of that dashboard, if you happen to favor, you can too begin with Explorer (reasonably than a Looker Studio report). Go to your Looker Studio dashboard and choose “Explorer” within the prime menu.

Create a brand new Explorer view by clicking the “Create” button on the left facet..
At first, Explorer confused me. It feels similar to the core Looker Studio — what was the purpose of getting each?
Nonetheless, after spending a while in Explorer, I’ve come to understand its distinctive worth.
In contrast to Looker Studio, any modifications you make to a chart in Explorer are momentary. Meaning it’s an incredible place to dig into your knowledge and check out alternative ways of visualizing it with out making any everlasting modifications. Then, when you’re completely happy together with your chart, merely export it again into Looker Studio.
To do that, click on the small sharing icon within the prime navigation bar.

Then select whether or not so as to add your Explorer work on a brand new or current Looker Studio report.
Superior Google Looker Studio Ideas
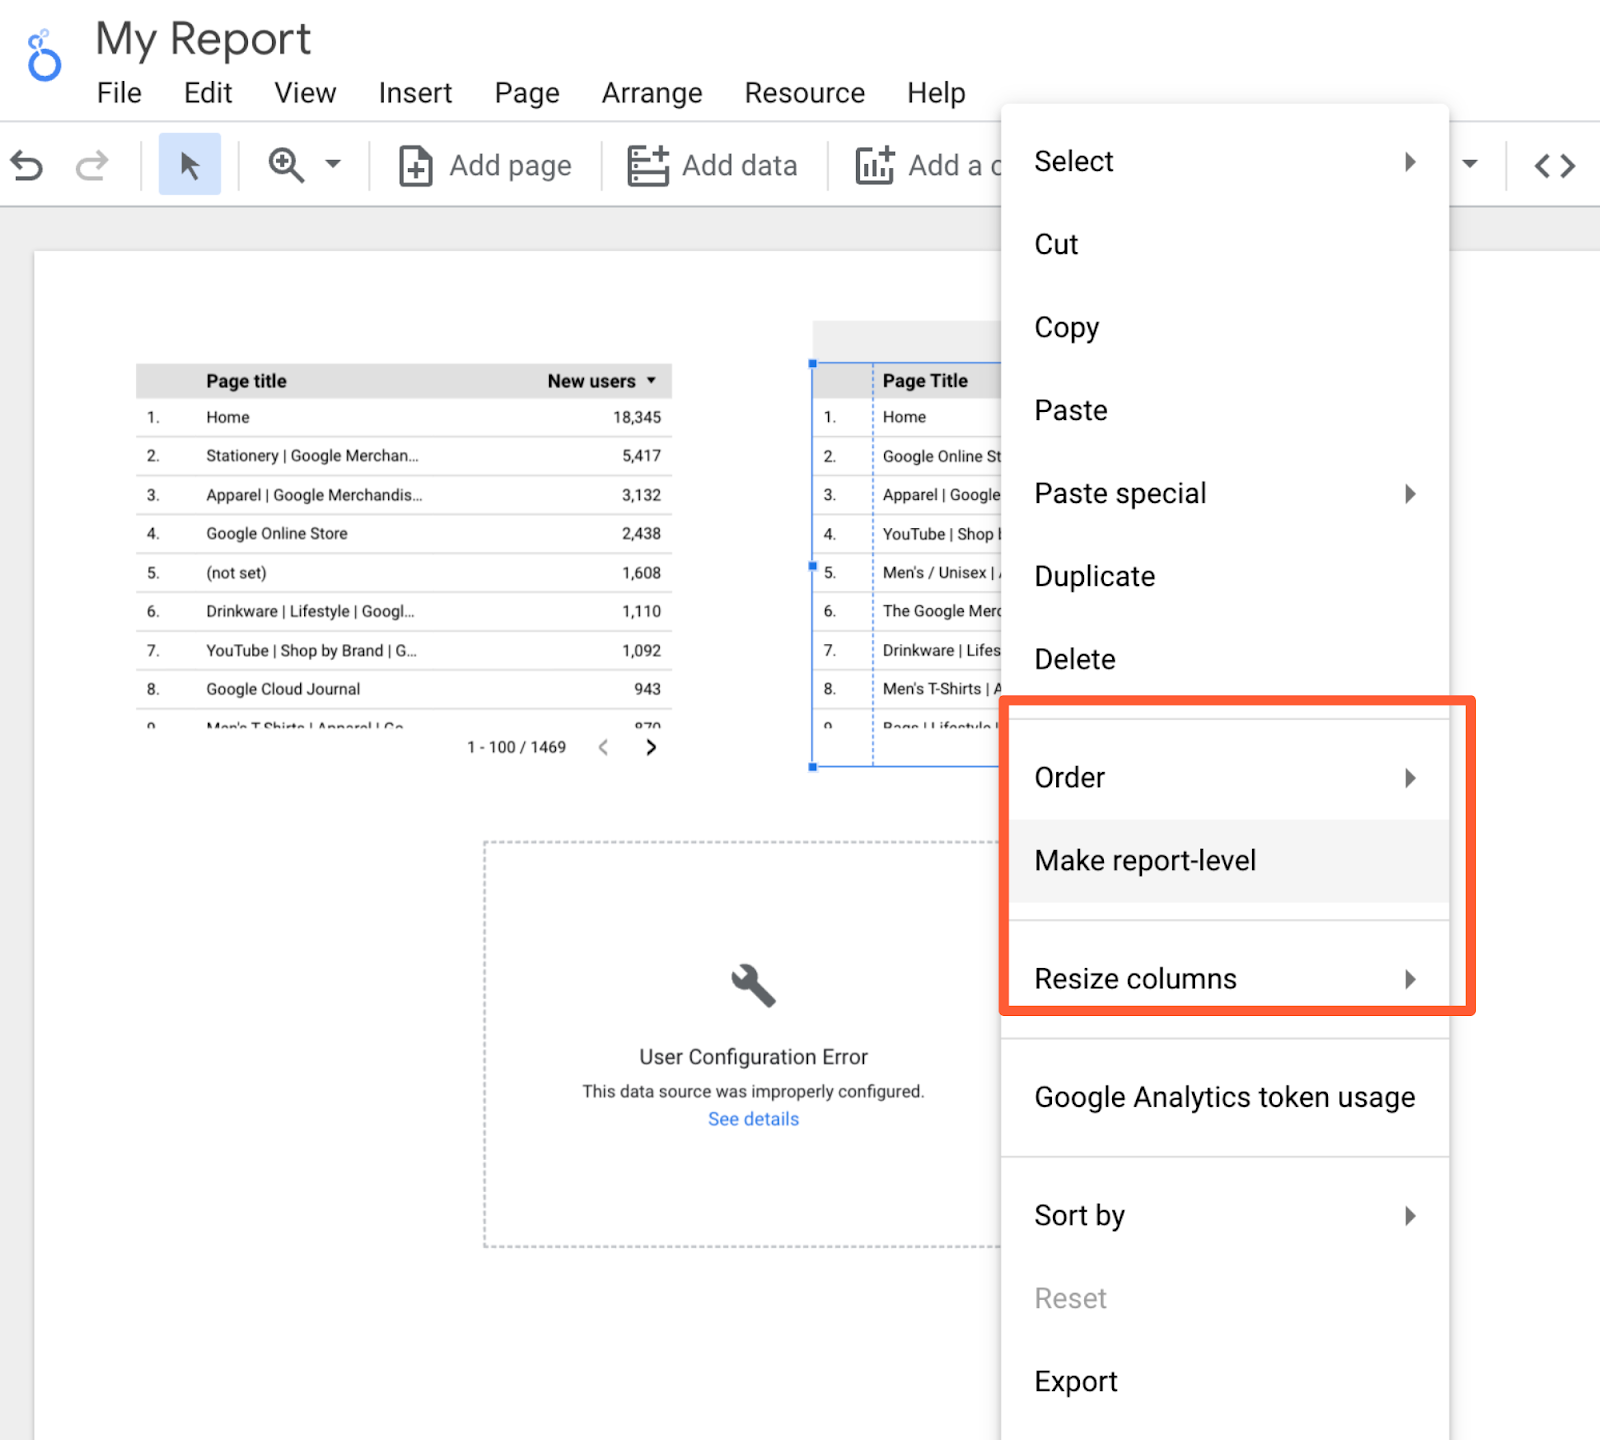
12. Create report-level filters.
By default, a filter applies to each chart on that web page. However what if the viewer goes to the following web page? The filter received’t go along with them.
That is complicated for non-technical people and inconvenient for data-savvy ones. To carry a filter up from page-level to report-level, merely right-click on it and choose “Make report-level.”
13. Create blended fields.
Looker Studio is highly effective as a result of you possibly can herald 760+ sources of knowledge right into a single report. However, due to a brand new characteristic, blended sources, it simply acquired even mightier.
Heads up: it will get a bit technical. Stick with me, and I promise it’ll be value it.
If you happen to’re accustomed to JOIN clauses in SQL, you’ll perceive knowledge mixing instantly. No thought what SQL is? Not an issue.
One of the simplest ways to consider mixing knowledge is with a Venn Diagram. You will have two knowledge units. Every knowledge set has distinctive data — e.g., corresponding to the information residing within the inexperienced and blue areas.

However they’ve (at the least) one knowledge level in frequent: the knowledge within the blue-green overlap part.
This shared knowledge level is called a key. In case your knowledge units do not need a key, they’re not blendable.
For instance, suppose you wish to examine how customers behave in your web site versus your app. The secret’s the person ID, a customized dimension you’ve created in Google Analytics that your app analytics software program additionally makes use of. (Observe: The important thing doesn’t must have the identical identify in each knowledge sources; it simply must have an identical values.)
You mix your web site conduct report from GA together with your app utilization report. This offers you all of the data from the primary report together with any matching ones from the second; in different phrases, if a person has visited the location and used the app, they’ll be included.
Nonetheless, in the event that they solely used the app however didn’t go to the location, they won’t be included within the new blended knowledge.
This is called a LEFT OUTER JOIN. (To be taught extra, take a look at this W3Schools primer.) Why do you care? As a result of the order of your knowledge sources issues.
Put your major knowledge supply first — e.g., the one the place you need all of the values, no matter whether or not there’s a match in your second supply.
Now that we’ve gotten all that out of the way in which, let’s arrange a blended subject.
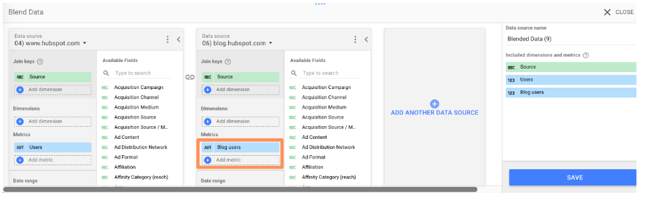
First, add a chart to your report, then click on on “Mix Knowledge.”

This panel will pop up:
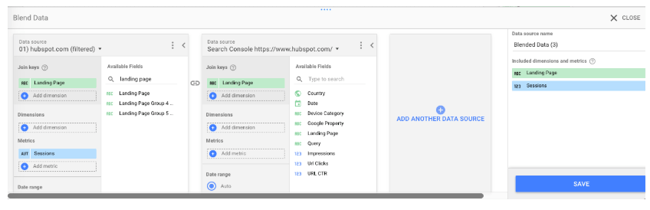
Choose your first knowledge supply on the left. Bear in mind, that is the first knowledge supply. Then add your second knowledge supply. Looker Studio permits you to add as much as 5 knowledge sources in a chart, however let’s stick to 2 for now.
Now choose your be a part of key(s). If the sphere exists in each sources, it would flip inexperienced. If it doesn’t exist, you’ll see this:

Keep in mind that the important thing acts as a filter for the second knowledge supply. So on this instance, solely data that match the touchdown web page from the GA view for hubspot.com can be pulled from Google Search Console.
Selecting a number of keys will additional restrict the variety of data pulled from the second knowledge supply.
When you’ve picked your be a part of key(s), choose the size and metrics you wish to see on your first knowledge supply. Then do the identical on your second.
You can too restrict the outcomes by including a filter or date vary (or for GA sources, segments). Filters, date ranges, and segments utilized to the left-most knowledge supply will carry over to the opposite knowledge sources.
When you’ve completed customizing the report, click on “Save.” Congrats: you simply created your first blended knowledge chart!
If you happen to discover it simpler to create two separate charts after which mix them, Looker Studio affords an incredible shortcut.
Simply choose each charts, right-click, and select “Mix knowledge.”

14. Mix your knowledge supply with itself.
Do that workaround if you happen to’re bumping into limitations together with your knowledge supply connectors: mix an information supply with itself.
To present you an thought, the GA knowledge connector solely permits you to add one “lively person” metric to a chart, so there’s no technique to see 1 Day Lively Customers, 7 Day Lively Customers, and 28 Day Lively Customers on the identical chart… except you mix your Google Analytics knowledge supply with itself.
Observe the identical directions as above, however as a substitute of choosing a brand new supply on your second knowledge supply, simply choose the primary one once more.
And since all the fields are an identical, you possibly can choose whichever be a part of key you’d like.

This selection can also be excellent when evaluating developments throughout two-plus subdomains or segments.
For example, I needed to have a look at natural customers for the HubSpot Weblog (weblog.hubspot.com) and first website (www.hubspot.com) on the similar time.
This helps me work out if we’re rising search site visitors throughout the board. It’s additionally useful when site visitors decreases — have rankings dropped site-wide, or simply for the weblog (or the location)?
Nonetheless, you possibly can’t add two separate “person” metrics to a chart without delay… except, in fact, you’re mixing knowledge.
Create a brand new blended knowledge supply (following the identical course of as above) to set this up.
Add your first view to the left-most column, your second view to the next column, and so forth.
Observe: Be sure to’re selecting views with mutually unique knowledge. In different phrases, I wouldn’t wish to use “weblog.hubspot.com” as my first supply and “weblog.hubspot.com/advertising and marketing” as my second supply as a result of all the information for the weblog.hubspot.com/advertising and marketing view is included within the weblog.hubspot.com one.
Due to that overlap, we wouldn’t have the ability to spot developments clearly.
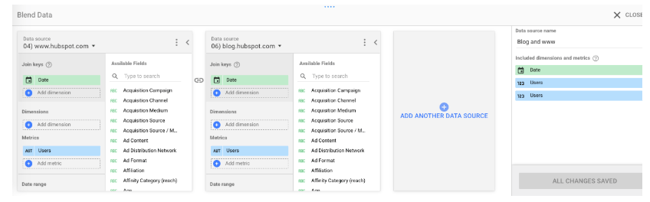
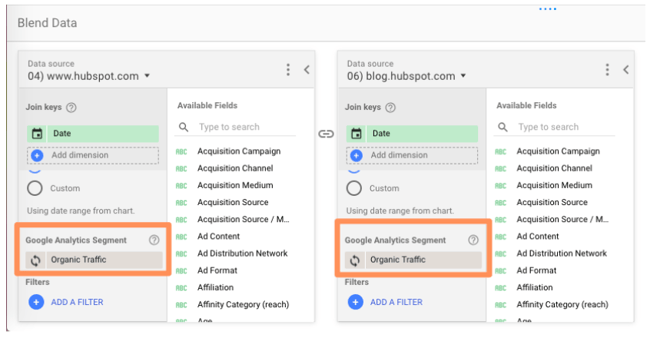
I added the natural site visitors phase to each sources, however you possibly can select whichever phase you’re thinking about (paid site visitors, social site visitors, and so on.) Or depart it off fully! Tons of prospects right here.
In truth, listed below are some extra concepts for mixing a supply with itself:
- Examine two-plus customized segments
- Examine two-plus touchdown pages
- Examine two-plus purpose completions
15. Create a primary calculated subject.
When your current knowledge doesn’t offer you sufficient data, it’s time to create a calculated subject.
Calculated fields take your knowledge and, as their identify suggests, and make calculations.
It’s in all probability best to clarify with an instance.
Let’s say you wish to have a look at the typical variety of transactions per person. You possibly can create a calculated subject that takes the metric “Transactions” and divides it by the metric “Customers.”
As soon as this subject has been created, it’ll be up to date routinely — so you possibly can change the chart’s time vary, dimensions, and so on., and the typical transactions per person knowledge will replace accordingly.
There are two methods to create a calculated subject.
Create a data-source calculated subject
This selection makes the sphere accessible in any report that makes use of that knowledge supply.
It’ll even be accessible as a filter management or in new calculated fields (like calculated subject inception).
Clearly, this can be a good possibility if you happen to plan on utilizing this practice metric greater than as soon as. The one caveat — you will need to have edit rights to the unique knowledge supply. You can also’t use an information supply calculated subject with blended knowledge.
To create a data-source calculated subject, add a chart to your Looker Studio dashboard, then select the information supply you wish to derive your new subject from.
Click on “Add a brand new subject” within the decrease left-hand nook.

(You can too do that by clicking the pencil subsequent to the information supply after which deciding on “Add a subject” within the higher proper nook of your subject menu.)
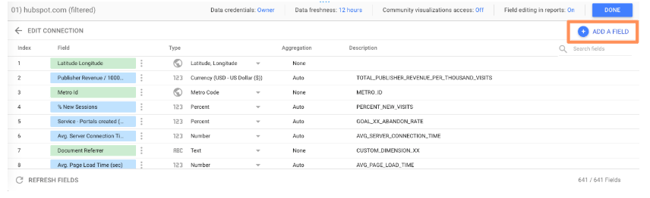
Use the left menu to seek for the metrics you want; click on one so as to add it to the components.
If the components has an error, a notification will seem in crimson beneath the editor explaining the place you went incorrect.
In case your components works, you’ll get a inexperienced checkmark.
Click on “Save” so as to add your new subject to the information supply.
And don’t overlook to call yours — which I forgot to do. 🙂
Now you possibly can add this calculated subject to any chart identical to a daily subject.
Create a chart-level calculated subject
For this selection, you’ll solely have the ability to use the sphere for that particular report.
This selection is a bit simpler as a result of all the restrictions of the opposite kind are reversed.
When you can’t use a chart-level calculated subject in one other chart, filter management, or extra calculated subject, you don’t want edit rights to the unique knowledge.
You can too use a chart-specific calculated subject for knowledge mixing, which we’ll cowl within the subsequent step.
To create a chart-level calculated subject, merely click on “Add a subject” beneath the prevailing dimension(s) and metric(s) you’ve chosen.

From right here, enter the components on your new subject — merely typing within the identify of your required metric will set off a menu of choices — and click on “Apply.”
Your new subject can be added to the chart.
Loves Knowledge’s Benjamin Mangold has a wonderful round-up of pattern calculated metrics, together with:
- Common purpose completions per person
- Non-bounce fee
- Pageviews per transaction
- Worth per session
You possibly can test it out for inspiration.
If you would like a bit observe earlier than you begin going to city by yourself knowledge, Google affords a useful pattern train.
16. Create a complicated calculated subject.
Okay, so there’s loads you are able to do with easy algebraic calculated fields. However there’s much more you are able to do when you introduce capabilities and RegEx.
Don’t be scared off! We’ll stroll by these step-by-step.
If you happen to’re comfy with Google Sheets and/or Excel capabilities, you already know how one can use capabilities in Looker Studio.
For example, let’s say that you just majored in English, and it’s all the time bothered you that “Supply” in Google Analytics is lower-case.
You should use the UPPER operate to rework Supply into all upper-case.
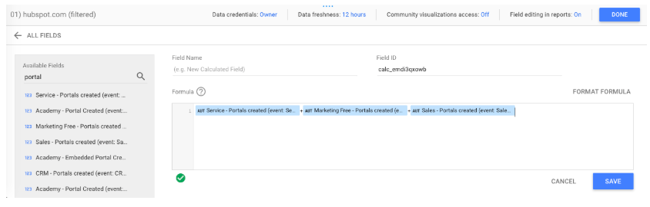
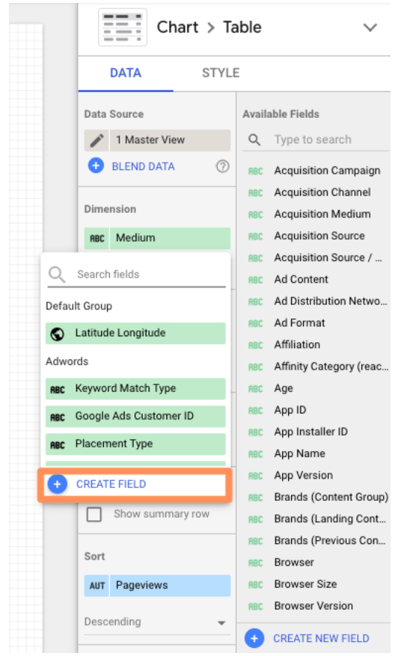
Merely click on “Add dimension” > “Create new subject.”
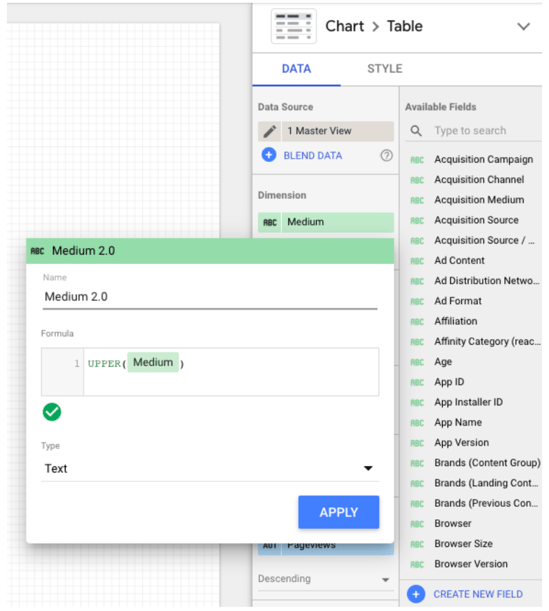
As Google Sheets knowledgeable Ben Collins factors out, this trick can even standardize any customized naming; for instance, if some individuals in your crew used “chat” for a marketing campaign, and others used “Chat,” the UPPER operate will combination each collectively.
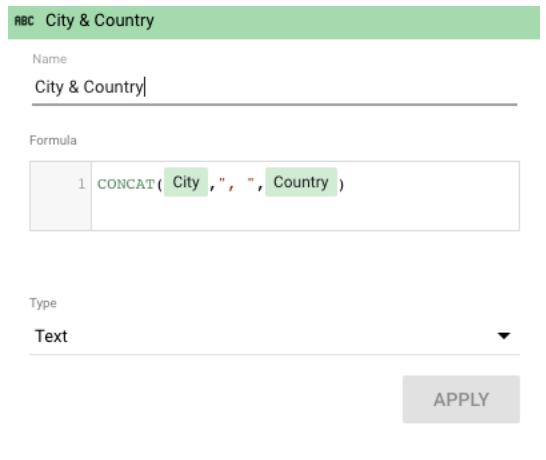
Maybe you wish to create a brand new subject for metropolis and nation.
Simply click on “Add dimension” (since metropolis and state are categorical, not quantitative, variables) > “Create subject.”
Then use the CONCATENATE operate to smush collectively the Metropolis and Nation fields.
Take a look at the full listing of capabilities Looker Studio helps.
One of many niftiest is CASE. If you happen to’re unfamiliar, it’s primarily an IF/THEN assertion. This operate permits you to create customized groupings.
For instance, let’s say you’re wanting on the desk we created within the final step:
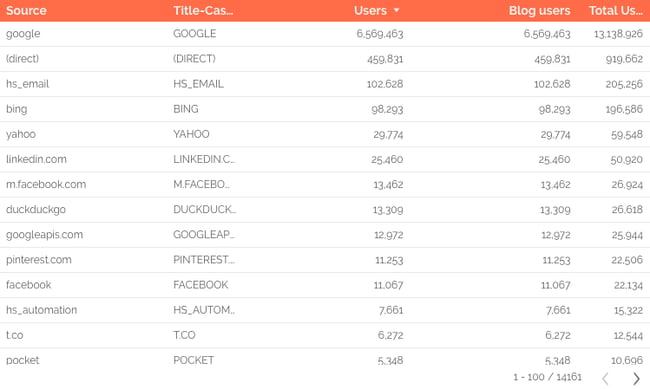
Right here, Looker Studio is treating Fb cellular site visitors (m.fb.com) and desktop site visitors (Fb) as two totally different sources. There’s additionally l.fb.com — desktop site visitors coming through a hyperlink shim, which Fb applied in 2008 to guard customers from potential spam. What if you wish to mix all Fb site visitors right into a single supply?
A CASE components solves this problem neatly. Right here’s the components:
CASE
WHEN situation THEN end result
WHEN situation THEN end result
ELSE end result
END
You possibly can have one situation (like the instance beneath) or a number of. The ELSE argument is non-compulsory, so be at liberty to go away it out if you happen to don’t want it.
Right here’s the components we’ll use to group Fb site visitors:
CASE
WHEN REGEXP_MATCH(Supply,”^(l.fb.com|m.fb.com|fb.com)$”) THEN “Fb”
END
This components tells Looker Studio, “If the supply matches l.fb.com, m.fb.com, or fb.com, name it ‘Fb.’”
So as to add a CASE components, you will need to have the ability to edit the information supply.
Click on the pencil icon subsequent to your supply to carry up the information subject editor.
Then click on “Add a brand new subject” within the higher proper nook.
Enter your components.

If the components works, you’ll see a inexperienced checkmark. Give your new subject a reputation and click on “Save.” Now you possibly can add this subject to any chart or knowledge viz that makes use of this knowledge supply.
You is likely to be considering, “Okay, nice, however was that components written in Klingon? How do I give you my very own?”
Don’t know RegEx? No downside! This weblog put up has 5 formulation to get you began.
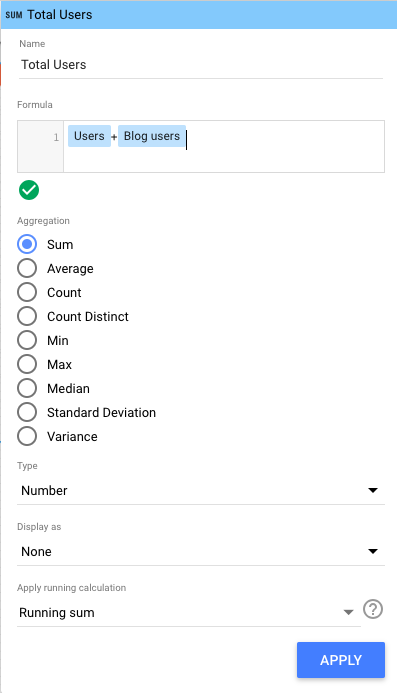
17. Create a calculated blended subject.
That is the top of Looker Studio mastery, requiring all the abilities you’ve already discovered and a healthy dose of luck — simply kidding, it’s tremendous straightforward.
Create a blended knowledge supply per standard.
On this instance, I blended collectively the GA views for www.hubspot.com and weblog.hubspot.com.
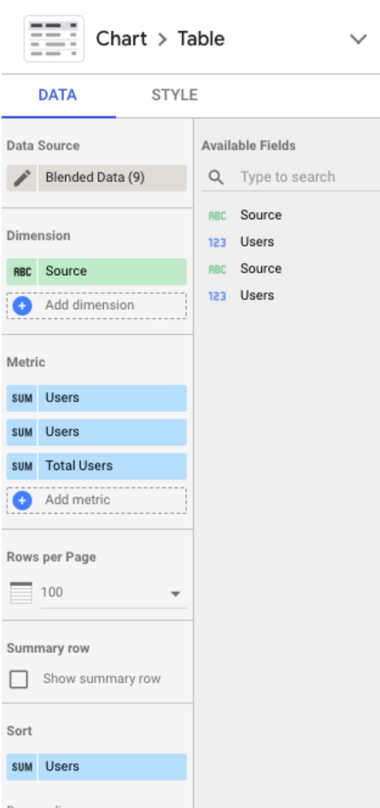
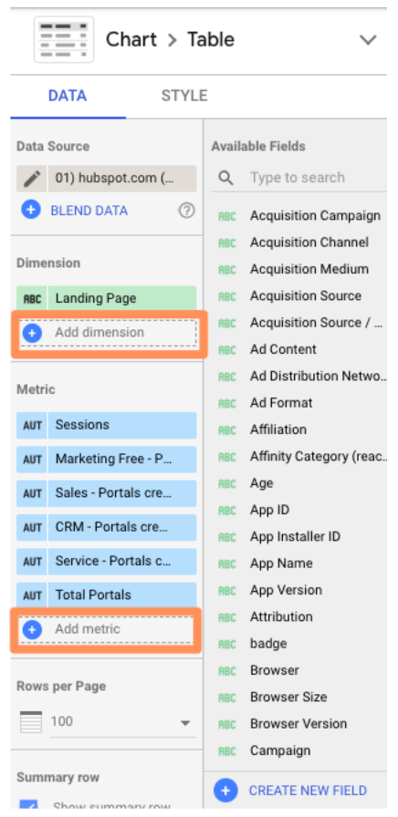
Then click on “Add metric” > “Create Discipline” as you’ll to create a standard calculated subject.
Enter your components.
I needed to see “Whole Customers” (i.e., customers from www.hubspot.com plus customers from weblog.hubspot.com), which is a straightforward calculation:
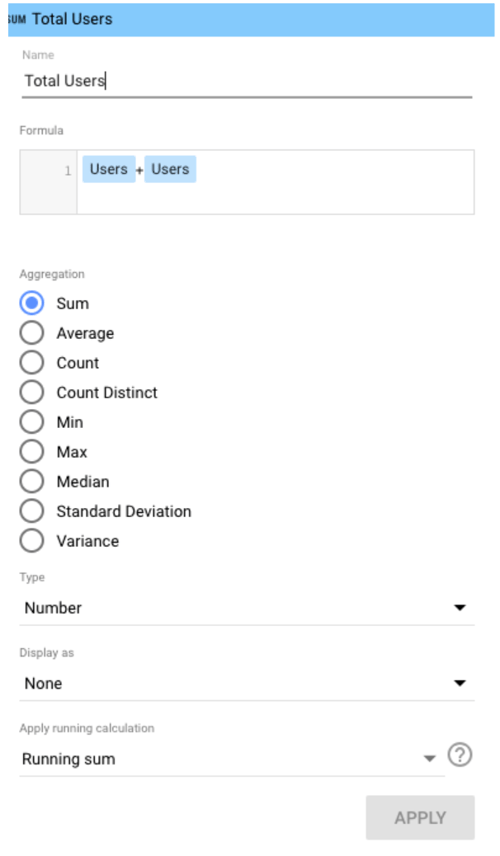
Observe: It could actually get a bit furry right here if you happen to’re utilizing two totally different fields with the identical identify, as I’m doing right here. Generally Looker Studio is sensible sufficient to acknowledge the distinction, and generally it’s not.
If you happen to run into points, I like to recommend enhancing the identify of 1 or each fields within the unique knowledge supply(s), which you are able to do at any time by clicking the pencil subsequent to the blended knowledge supply.
Then click on the pencil subsequent to the sphere identify you wish to change.
Then click on “Save” and return to your calculated subject to replace the components:
.png#keepProtocol&description=The+Final+Information+to+Google+Knowledge+Studio+in+2020)
Completed! I can now see each in my report.
Google Looker Studio is the Finest Strategy to Visualize Your Knowledge
Now that Looker Studio inside and outside, you’re well-prepared to create beautiful interactive stories on your coworkers, purchasers, and executives. Use the guidelines I shared above to take advantage of it and efficiently present the ROI of your advertising and marketing efforts.
Editor’s word: This put up was initially revealed in October 2018 and has been up to date for comprehensiveness.
